Pumpkin Treat Bag
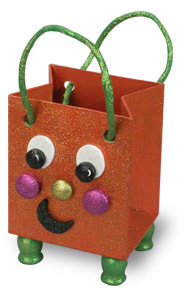
Using a papier mache bag, some twinkles and acrylics you can make a pumpkin treat bag. This is great for the kids to help out with making their trick-or-treat bag.

Materials:
- Americana Acrylics
- DA151 - Royal Fuchsia
- Dazzling Metallics
- Craft Twinkles
- DCT14 - Black
- DCT1 - Crystal
- DCT3 - Gold
- DCT13 - Orange
- DCT16 - Lime Green
- DCT17 - Fuchsia
- 1" flat
- # 2 round
- Paper plates
- Brush basin
- Palette paper
- Papier mache pumpkin sack4 candle cups by Laras Crafts
- Paper towels
- Hot glue gun or tacky glue
- 2 buttons by Laras Crafts
- 4 plugs by Laras Crafts
- 1 round-head plugs by Laras Crafts
- 2 small moons by Laras Crafts
- 4 1" x 1" ovals by Laras Crafts
Steps:
- Wipe away any dirt or debris from the surfaces.
- Using the 1" flat brush, paint the papier mache sack Cadmium Orange. Allow to dry, then paint with Orange Craft Twinkles.
- Paint the ovals Titanium White. After allowing to dry, paint with Crystal Craft Twinkles.
- Paint all the 3/4" plugs and moons Lamp Black. Allow to dry and paint with Black Craft Twinkles.
- Paint the round head plugs Royal Fuchsia. Allow to dry; paint with Fuchsia Craft Twinkles.
- Paint the buttons Glorious Gold. Allow to dry, then paint with Gold Craft Twinkles.
- Paint the candle cups Mistletoe Green and allow to dry. Paint with Lime Green Craft Twinkles.
- Using the #2 round brush, add Titanium White highlights to the Lamp Black plugs.
- On one side of the papier mache sack, position two ovals for the eyes and glue into place.
- Glue black plugs onto the ovals as the pupils.
- Position a gold button for the nose and glue into place.
- Position two of the fuchsia round head plugs into place for the cheeks and glue into place.
- Repeat steps 8-10 on the other side of the papier mache sack.
Read NextMake Your Own Wand DIY

