Spooky Beaded Spider Ring
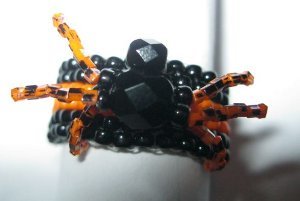
Use these Halloween crafts ideas to whip up a spooky beaded spider ring, the perfect way to top off a spooky Halloween ensemble. Turn beads into a creepy spider in a jiffy!

Materials:
- Beading Mat
- Beading Thread (I use Fireline)
- Size 15 beading needle
- Size 11 seed beads (preferably two different colored Delicas)
- Size 15 seed beads (same color as the size 11’s)
- 6 mm Bead (spider abdomen)
- 4mm Bead (Spider head)
- Bead stopper (I used size 8 bead)
Instructions:
Key: Front - side facing toward bead stopper
End - Side facing away from bead stopper, and toward the front.
Ring Procedure:
- Thread about 1 yard of beading thread onto your needle. Attach a bead stopper to end leaving a 6 inch tail. This will be sewn into beadwork later.
- Add six size 11 seed beads onto thread. Put on two black beads, then two orange beads, and then two more black beads. Slide beads to end.
- Point needle toward the end. I will label the beads one through six. The first bead (closest to your needle) is bead one, and the last bead (near bead stopper) is bead six.
- Put one black bead (size 11) on the string. Skip bead one and go through bead two only. Pull the string tight, and you will see that two beads are now sitting on top of each other
- Now, add an orange bead. Do this by skipping bead three and going through bead four.
- Add another black bead, by skipping bead five, and going through bead six. You should now be at the end.
- Turn needle around (toward the front) and add another black bead, by skipping bead six, and going through bead five.
- Add an orange bead, by skipping bead four and going through bead three.
- Add another black bead, by skipping bead two, and going through bead one.
- By now you should see a pattern: Go through the beads that are sticking out. To gain a better understanding of how this ring will be made, the Front and End I referred to, are actually the top and bottom of the ring (when put on your finger). The first six beads are the ring’s width; beads one through six will become rows one through six.
- Continue this pattern (of steps 4-9) until the beadwork is long enough to wrap around your preferred finger. Make sure to tighten the thread often, to make the beadwork free of gaps.
- Once you believe the ring is the right length, with your hands, pull the ends together. If beads 1, 3 and 5 fit between beads 2, 4 and 6, you are done adding beads to your ring. If not, add one more row (or column) of beads, so that the ends fit together as described.
- You should be exiting bead one. To sew the ends together, go through bead one (on the other end of the beadwork) in the direction of the bead stopper. Then go through bead tow, and three etc. To do this you go back and forth between the last columns of beads on either end. The ends should look like this •○•○•○ (• being one end, and ○ being the other)
- Sew the string in to the beadwork to hide it. Do the same with the 6 inch tail made at the beginning. You are now finished with creating the ring. Next you will decorate it with the spider.
*The procedure to make the spider is a little vaguer than the ring, because the directions depend on how much you want the legs to be bent. Attaching the spider just requires common sense.
Spider Pocedure:
- Using about one yard of beading thread, (with a bead stopper on the end with a six inch tail) string on the 6mm bead.
- String on one size 11 bead, and eight size 15 beads.
- Skip the first size 15, and then sew back through all the beads (even the 6mm). You have created one leg.
- Do the same on this side of the spider. You now have two legs.
- Repeat steps two and three until you have four legs.
- Repeat steps two and three, using only seven size 15’s, until you have six legs.
- If you want to detail the legs further, draw on them with a permanent marker.
- Now that you have six legs, sew through to the “foot” of one of the first pair of legs you created. This will be attached to the bottom row of beads on your ring.
- To do this, sew upward, from a bead on the bottom row, through your ring until you reach the middle row. The leg should now be attached. Work your way to the 6mm (when spider is positioned correctly) and go through it.
- Starting at the middle row of the ring, sew downward until you reach the bottom row where you want to attach the other bottom leg. This should secure the spider’s abdomen (6 mm bead.)
- Go through the leg, starting at the foot, to the 6mm. You are now on the other side of the spider.
- Sew the sting into beadwork, secure the thread to the ring with knot, and cut the string. This will secure the spider further, and finish attaching the spider’s body.
- Now, using the six inch tail you created earlier (after removing the bead stopper) sew into the ring, from the middle row, up one row.
- String on the 4mm bead (the head) and sew into the beadwork where you exited the head.
- To secure the head further, work your way through the beadwork and go through the head again.
- Sew through the beadwork on the opposite side, secure the thread to the ring with a knot, and cut it. You are now finished with the project.
Read NextCute Polly Pumpkin
Your Recently Viewed Projects
Report Inappropriate Comment
Are you sure you would like to report this comment? It will be flagged for our moderators to take action.
Thank you for taking the time to improve the content on our site.

