Witch Teapot Pumpkin
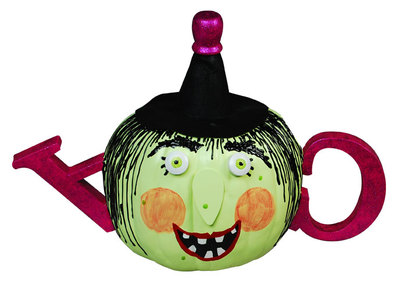
Which is it: a witch, a teapot, a pumpkin? You get all three with this silly Halloween craft. It'll look good decorating your kitchen this Halloween.
Check out this project and more ideas in 17 Pumpkin Patterns: Free Projects for Halloween!

Materials:
DecoArt Products Required
Americana Acrylics
- DAO1 - Snow (Titanium) White
- DAO22 - Burgundy Wine (transparent)
- DAO67 - Lamp (Ebony) Black
- DA134 - Yellow Green
- DA232 - Vivid Violet
- DA252 - Lemonade
Americana Writers
- DAW67 - Black
Craft Twinkles
- DCT17 - Fuchsia
Multi-Purpose Sealer
- DS17 - Multi-Purpose Sealer
Americana Spray Sealers
- DAS12 - Americana Gloss Spray
Americana Brushes
- DBL1002-B - Liner 2
- DBF2575-B - Flat 3/4"
- DBF3008-B - Shader 8
Supplies
- Unfinished wood pieces: 7/8" candle cup; XL teardrop, Forster's Woodsies; two 1" roundhead plugs
- Foam plate
- 1/4" round foam pouncer brush
- Lo-temp glue gun and glue sticks
- Tissue paper or newspaper
- Craft knife
- Pencil
- 4 1/2" felt witch hat (6" at base)
- Eva Foam Letters: Letter C, 474882; Letter A, 470765 (Purchased at Hobby Lobby)
- One 8" x 10" foam pumpkin
Steps:
Preparation: Remove all stickers or labels from surfaces.
- Remove stem from pumpkin.
- Paint pumpkin and teardrop shape for nose Lemonade using flat brush; let dry.
- Use shader brush and Snow White to paint roundhead plugs for eyes; let dry.
- Refer to photo and use craft knife to cut off thin diagonal side of Letter A.
- Use flat brush and Vivid Violet to paint letters and candle cup; let dry.
- Referring to photo for placement, glue Letter C for handle to side of pumpkin, pressing tip and side edge of C into pumpkin and holding in place until glue sets. Glue Letter A portion upside down on opposite side of pumpkin for spout.
- Pack top of witch hat with tissue or newspaper to make it firm.
- Glue eyes and nose to front of pumpkin face. Glue open end of candle cup over tip of witch hat.
- With pouncer brush dipped in Yellow Green, paint iris on each eye. Use end of paintbrush handle dipped in Yellow Green to dot on warts. Let dry.
- Mix four parts Multi-Purpose Sealer to one part Burgundy Wine. Thinning slightly with wet shader brush, paint large circles for cheeks; let dry.
- Use pencil to draw mouth shape and uneven teeth outlines. Use shader brush and Lamp Black to paint inside of mouth and let dry.
- Use shader brush and Snow White to paint teeth. Let dry.
- Use liner brush and Burgundy Wine to outline mouth; let dry.
- With Black Americana Writer, dot on eyes, bushy eyebrows, eyelashes, and lines for bangs and longer hair strands at sides of face. (Begin these at 2 from top center.) Let dry.
- Paint over Vivid Violet handle, knob, and spout with Fuchsia Craft Twinkles and flat brush. Let dry.
- Spray with pumpkin with Americana Gloss Sealer; let dry.
- Glue beneath rim to attach hat to top of pumpkin, making sure edges are secured.
Check out this other cute pumpkin project!
Your Recently Viewed Projects
Weberme
Oct 23, 2018
Now this witch teapot is such a clever idea to do. I would keep this inside though after all the hard work painting it. I love the witch hat as the top and I would use a pom pom on the very top. I really love the spout and handle idea. A super conversation piece.
Report Inappropriate Comment
Are you sure you would like to report this comment? It will be flagged for our moderators to take action.
Thank you for taking the time to improve the content on our site.

