Halloween Cat and Mouse Costumes
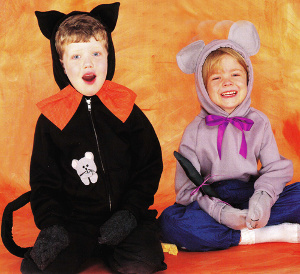
Make a pair of costumes, black cat and mouse, for friends or siblings this Halloween. These homemade Halloween costumes designed by Heidi Borchers of Inspired at Home are made inexpensively by embellishing sweatshirts. For the black cat Halloween costume, you can also sew up Halloween Horns using a headband instead of a hood.

Materials
For each:
- 2 chenille stems
- Aleene’s® Super Thick Tacky Glue™
- Aleene’s® OK to Wash-It® Glue
- Aleene’s® Stop Fraying® Glue
- 1 (4” x 31” ) strip black fabric
- Black thread
- Batting
- Black embroidery floss
- Waxed paper
- Book (or phone book)
For cat:
- Black sweatshirt jacket with hood and pocket
- Felt: black, light gray, pink, black-and-grey
- Orange Halloween print fabric: 1 (1” x 12”) strip, 2 (5” x 6”) pieces
- Clothespins
- 2 (/14” diameter) black half-round bead eyes
For mouse:
- Gray sweatshirt jacket with hood
- Gray felt
- Purple satin ribbon: 20” length (1” wide) , 14” length (1/8” wide)
- Pop-up craft sponges
- Pattern
Instructions for cat:
-
Transfer ear pattern to black felt and cut 4. Bend 1 chenille stem to fit edge of 1 ear from fold line up one side to tip and down other side to fold line. Trim ends of stem even with fold line. Spread coat of Tacky glue on 1 ear from tip to fold line. Do not put glue on tab of ear. Press chenille stem into glue. With edges aligned, press another felt ear into glue. To keep ear flat while drying, place ear between two pieces of waxed paper and lay flat on table. Place phone book on top. Let dry. Repeat to create 2nd ear.
-
To attach each ear to sweatshirt, find center top of hood. On each side of center, apply 1 (4” long) line of Stop-Fraying Glue parallel to front of hood, each about ¾” from center and 1-1/2” from front of hood. Let dry. Cut along center of glue lines. Insert tab of 1 ear into each slit in hood. Fold tabs up and glue to inside of hood at front and back of ear, using OK to Wash It Glue. Pin tabs in place until glue is dry.
-
With right sides facing and raw edges aligned, fold black fabric in half lengthwise and trim one end to point (to create end of tail). To make tail, stitch along long edge, using ¼” seam. Turn tail right side out and stuff firmly with batting. Cut opening in waistband seam at back of jacket. Slip ½” of open end of tail through seam opening. Stitch seam closed, catching tail in seam. Tie orange fabric strip in bow around tail.
-
For bow tie, turn under ½” along both long edges and one short end of each 5” and 6” orange fabric piece and glue with OK to Wash-It Glue. Let dry. Pleat unhemmed short end of each piece. Place pleated end of one tie piece on each side of hood. Turn ¾” of end to inside of hood and glue with OK to Wash-it Glue. Use clothespins to hold pieces in place until glue is dry.
-
For mouse in pocket, transfer patterns to felt and cut 1 head and 2 paws from light gray, 2 inner ears from pink, and 1 tiny triangle from black for nose. Glue felt pieces to jacket above pocket (use photo as guide) with OK to Wash-It Glue. Glue bead eyes to head, using OK to Wash-It Glue. Let dry. Stitch whiskers and mouth on head, using embroidery floss.
-
For each paw, cut 2 (4-1/4” x 9”) pieces of black-and-grey felt, rounding 1 short end of each piece to create a mitten shape. With edges aligned, stitch felt pieces together from short straight edge, up around rounded end, and back to short straight edge, using ¼” seam. Leave straight edge open to insert hand. Stitch details on paw, using embroidery floss.
Instructions for mouse
-
Transfer ear pattern to felt and cut 4. Referring to cat directions, make 2 ears, using gray felt and chenille stems. Referring to directions for cat, glue ears to hood of jacket. Tie 1” wide ribbon in bow and glue to neck of jacket. Referring to directions for cat, make tail and stitch to back of jacket. Tie 1/8” wide ribbon in bow around tail. Referring to Step 6 of directions for cat, make 2 paws from gray felt.
- To make wedge of cheese, cut 2 triangles 5” high and 3” wide at base from craft sponges. Cut rounded indentations in each long edge of each triangle. Dip each sponge into water to expand and wring out water. Let dry. With edges aligned, glue sponge pieces together with Tacky glue.
Check out other Halloween crafts and costumes in the How to Halloween eBook.
Read NextSewn Halloween Apron

