Crocus Charms Bracelet
Create your own polymer clay beads for this unique charm bracelet from AMACO.

Materials:
- AMACO® Tri-Bead Roller (7/16" round)
- AMACO® Professional Bead Baking Rack
- AMACO® Needle Tool
- FIMO® Soft Polymer Clay - Metallic Pearl, Metallic Purple, Metallic Gold
- One charm bracelet (WESTRIM brand crafts style # 54920) Gold or Silver
- Two packages 8mm bead caps (WESTRIM brand crafts style # 5302/4) Gold or Silver
- One package 2" eye pins (WESTRIM brand crafts style # 5817/4) Gold or Silver
- One package 6mm jump rings (WESTRIM brand crafts style # 5905/3) Gold or Silver
- Wire cutters
- Lisa Pavelka's Poly Bonder (JHB International Inc.) or super glue
- Super fine grit sandpaper or sanding sponge
- Future brand (S.C. Johnson) acrylic floor finish or preferred gloss finish
- ½" paint brush
Instructions:
- Tint FIMO® Metallic Pearl clay by adding a small amount of Translucent Yellow. Repeat with Metallic Pearl and Metallic Purple until you achieve the desired pastel colors (approximately 1 part color to 10 parts pearl). Following the directions included in the AMACO® Tri Bead Roller, measure enough clay to form six small, round beads of each of the three colors (pastel yellow, lilac and pearl).
- Form one end of each bead to fit inside the bead caps. Using the eye-pin, pierce the bead through the center hole of the bead cap until the eye-pin is visible through the center of the opposite side.
- Following the lines as shown in Diagram A, place the AMACO® Needle Tool lengthwise over the center hole, making impressions across the bottom to form the bud shaped petals.
- Remove the eye-pins and set aside. Bake the beads on the AMACO® Professional Bead Baking Rack according to package instructions.
- Make six very tiny balls of each of your three custom FIMO® colors. Using a tiny yellow ball on the white beads, a tiny purple ball on the yellow beads and tiny white ball on the purple beads, place them in the center hole of each bead as shown in Diagram B. Attach each ball with a small drop of poly bonder adhesive. Bake again according to package instructions. If any of the bead caps are loose you can secure them with a small drop of poly bonder adhesive.
- (Optional) At this point you may want to "wet sand" any little imperfections in the clay (fingerprints, etc.) using a super fine grit sandpaper or sponge.
- (Optional) Apply several THIN coats of future acrylic floor polish to each bead using a fine bristle paintbrush. Allow beads to dry 20 minutes between coats. For an even more brilliant shine, you can then place them in a warm oven (200 degrees) for ten minutes.
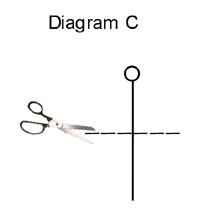
- Using wire cutters, cut the eye-pin length to fit into the pre-made holes as shown in Diagram C, so the eye-pin is flush with the top of each bead. Use poly bonder adhesive or super glue to secure the eye-pins in place. Insert eye-pins and attach in the pre-made holes so they are flush with the top of each bead.
- Using 6mm jump-rings, attach beads to the bracelet alternating colors with one bead on every other link.
Read NextLover's Eye Necklace

