Metallic Flair Necklace
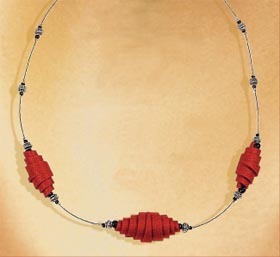
Use seed beads and clay to create a unique metallic flair necklace from AMACO. Triangles of bright red clay are rolled tightly to create the beads in this polymer clay jewelry. For help with the techniques, check out this great video on how to use bead rolling tools.

Materials:
- FIMO Soft, 2 oz. block of: Metallic Red (#202)
- 20" length, 19 strand, .012 Bright Silver flexible beading wire from Beadalon®
- 12 Silver Metal Spacers, (size shown: 4 x 5mm)
- 6 Black Size “E” Beads
- 18 Black Seed Beads
- Silver Spring Ring Clasp
- 6 mm Jump Ring
- 22 Silver Crimp Beads, Size #1
- AMACO Bead Making Tool Set (includes cutting blade, template and mandrel used in this project)
- AMACO® Pasta Machine
- AMACO® Professional Bead Baking Rack
- Home Oven or Dedicated Toaster Oven
- Oven Thermometer
- Wire Cutters
- Crimping Pliers (or jewelry pliers)
- Ruler
Steps:
- Preheat oven to 265°F. Knead clay to condition. Roll through AMACO® pasta machine set at thickest setting (#7) four or five times to remove any trapped air pockets and create a flat sheet. Roll twice more, gradually reducing sheet thickness setting to #5, which will be the final thickness used. NOTE: If pasta machine is unavailable, roll clay with a clear acrylic roller or glass jar on a work surface covered with cardstock or parchment paper, creating a thin clay sheet, approximately 1/16" thick.
- Place cutting template found in AMACO® Bead Making Tool set onto clay and use cutting blade to cut out two small wedge shapes (with pointed ends) and one large (see Fig. 1). Remove excess clay.
- Beginning at widest end, wrap each clay wedge around large beading mandrel and roll, lightly wrapping to pointed end. Repeat for remaining two beads needed (see Fig. 2). Place mandrel onto AMACO® Professional Bead Baking Rack and bake beads for 40 minutes (see Fig. 3). Remove from oven and let cool. NOTE: If bead baking rack is unavailable, place mandrel onto scrap blocks of clay so that beads are suspended above a baking sheet during baking. This will eliminate shiny flat spots that can sometimes occur when baked directly on baking sheet.
- Slide two crimp beads onto one end of flexible beading wire. Insert wire end through loop on side of spring ring clasp, then back through crimp beads. Leaving a 1" tail Fig. 1 Fig. 2 Fig. 3 length on one wire end, position crimp beads to within 1/8" of clasp then flatten crimp beads with crimping pliers to hold clasp secure. Cut wire tail close to last crimp bead.
- Measure 1½" from clasp end and string on a crimp bead and crimp. String on a black seed bead, metal spacer, seed bead, then a second crimp bead then crimp the crimp bead to hold the sequence in place on wire. Measure 1" from last crimp bead and repeat same sequence, crimping to hold in place. Repeat once more.
- Measure 1" from last crimp bead, slide on a crimp bead and crimp. String on a Black seed bead, spacer, Black “E” bead, small wrapped clay bead, Black “E” bead, spacer, seed bead, and then another crimp bead and crimp to hold in place. Repeat by substituting large wrapped bead so that it will hang at front center of necklace once completed. Repeat the sequence once more, using remaining small wrapped clay bead.
- Duplicate opposite side of necklace by measuring 1" from last crimp bead, then adding three more sets of the bead sequence found in step #5. Each set should be crimped to hold arrangements 1" apart on wire.
- End by stringing two crimp beads and 6mm jump ring onto wire. Bring wire end back through crimp beads so that jump ring is held in a loop. Crimp beads 1/8" from jump ring so that the ring dangles freely. Cut excess wire.
Read NextKnotted Cord Bracelet

