Picasso Inspired Choker and Earring Set
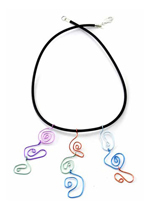
This choker set is inspired by the cubist shapes in the art of Pablo Picasso.
Materials:
- 20 gauge ColourCraft silver plated wire in pink, mint, grape, teal, orange, and blue
- 2.5mm Rubber Tubing
- 2 - 2.7mm Heavy tube cord ends, silver plated
- 12mm 2-ring Lobster clasp, silver plated
- 2 - Dapped & spring French ear wires
- BeadFix adhesive
- Designer round nose pliers
- Designer flush cutter
- Nylon jaw pliers
- Safety goggles
Materials:
-
Gather your materials and find a comfortable workspace. Each wire length of the cubist shapes will vary but should approximate 1.5 – 3 inches. Cut off several lengths of wire for experimenting. Practice will help you get a feel for the properties of the wire. 20 gauge in silver can be used for practice as well.
-
Each wire shape begins with a twist of the wire upon itself to create an anchor and prevent exposed edges. Use round nose pliers to grasp the end of the wire and turn it into itself creating a small loop.
-
Work the wire around or in opposition to the initial loop. Keep it flat between your fingers for at least one turn (either a tight spiral or a freeform loop) and place the wire into the nylon jaw pliers. Use the pliers as an anchor while you manipulate the wire into a free form shape. Do not worry about perfection; let the wire guide you. In the sample design, the shapes are all rounded – try using a jig to create angular shapes.
-
End each shape by curving the wire around the top of the shape with the tail facing up to ensure that the shape will dangle properly when attached to the choker, as shown.
-
Use nylon jaw pliers to work the top loop into a 45-degree angle from the front of the design for hanging purposes.
-
Once you are comfortable creating this kind of shape in ColourCraft, you can either make the nine necklace shapes and six smaller earring shapes in advance or make them as the necklace proceeds.
-
Build the choker design by anchoring each top shape to the rubber tubing. Open the top loop carefully to the side with round nose pliers and hook it onto the tubing. Tighten the loop gently with your round or nylon pliers until it is securely grasping the tubing.
-
Build onto the top shapes by attaching the top loops onto the bottom of each preceding shape. Make more or fewer shapes depending on your own aesthetic.
- Attach the ends of the rubber tubing to the heavy tube cord end using BeadFix Adhesive. Allow to set, then attach the lobster clasp.
Read NextWoodland Brooch

