Japanese Journal
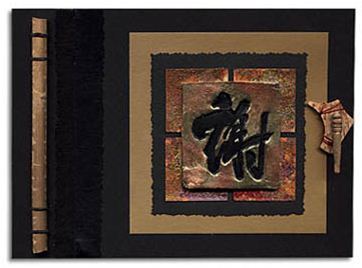
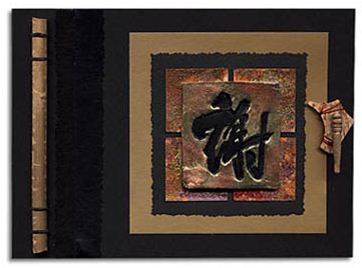
Make a beautiful Japanese-inspired journal with this project from Susan Pickering Rothamel. Mica pigments create a beautiful color background.
Materials:
- Excel Mat Board – Black – 2 - 5” x 7”
- Gildenglitz - Variegated
- Duo Embellishing Adhesive
- WireWorks
- Jewelz – Mica Pigments
- Perfect Paper Adhesive (PPA)
- Great Tape
- Art Paper - Japanese Fishwrap
- Texture Sponge
- Air Dry or Polymer Clay
- Rattan
- Book Cloth Tape
- Folia Cardstock – black, gold, various colors
- Beads
- Small black rubber bands
- Hole Punch
- Japanese Stamp - Hero Arts
Instructions:
- Cut a 1” strip from one piece of the 5 x 7 Excel Mat Board – Black
- Lay the two pieces of Excel Mat Board – Black next to each, leaving a 1/8” gap.
- Cut a strip of black book cloth 1” wide.
- Use Great Tape to adhere the book cloth to the 1” piece (spine) and the larger cut piece. Maintain the gap, because it will become the hinge.
- One half inch down from the top, and one half inch up from the bottom punch two small holes ½” apart. Cut 6 pieces of paper for the inside pages. Punch holes into the paper that line up with the 4 punched spine holes.
- Use two small rubber bands to attach the rattan, spine cover, and inside pages of the book together.
- Cut two pieces of Art Paper - Japanese Fishwrap for the insides of the cover. Attach with Great Tape
- Roll out a piece of clay. It should be about 1/8” thick and 2” square. Stamp image into the clay. Allow this to dry thoroughly. (Air dry or bake as directed.) Paint the clay with Perfect Paper Adhesive (PPA) and Jewelz – Mica Pigments
- Cut four squares from a piece of black card stock. Coat the paper with Duo Embellishing Adhesive and let dry. Apply Gildenglitz - Variegated and brush off excess with a Texture Sponge.
- Layer the gold, black, and gilded squares together with Great Tape. Attach the clay image with Perfect Paper Adhesive (PPA)
- Attach beads and some wire together for a handle.

