This project was submitted by one of our readers, just like you.
Child's Desk Makeover

Childs Desk Makeover
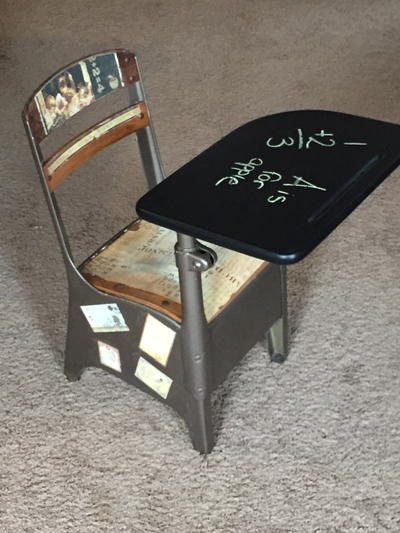
From the Designer: "I've always wanted to try a Photo Transfer project but never had the right project to try it out on. When I got this little desk I decided to give it a try! I used Plaid Craft's Photo Transfer Medium to turn this desk into a beautiful display piece that my kids can also use. The wood desk top was transformed into a usable Chalkboard with Plaid's Chalkboard Paint. Both the paint and transfer mediums were very easy to use and made this project a great success!"
Primary TechniqueFurniture Projects

Project TypeMake a Project
Materials List
- Plaid Crafts Mod Podge Photo Transfer Medium
- Plaid Crafts Chalkboard Paint
- Laser copied images
- Small wooden desk
Instructions
-
I started by painting all of the metal pieces of the desk with a spray paint to refresh the metal.
-
Next I painted the top of the desk with several coats of the Chalkboard Paint, letting each coat dry fully in between. Once it cured for a few days I conditioned the paint by rubbing chalk all over it and wiping it off with a cloth.
-
Then I made laser copies of my chosen scrapbook paper. Because mine had words I had the copies mirrored.
-
I measured the area I was going to put my papers and then cut them down to size.
-
Next I applied the photo transfer medium in an even coat to the front of my images and then applied them to my desk.
-
I smoothed down the paper with a scraper tool to make sure it was evenly applied to my surface and wiped away any excess medium.
-
Then I let everything dry for twenty four hours.
-
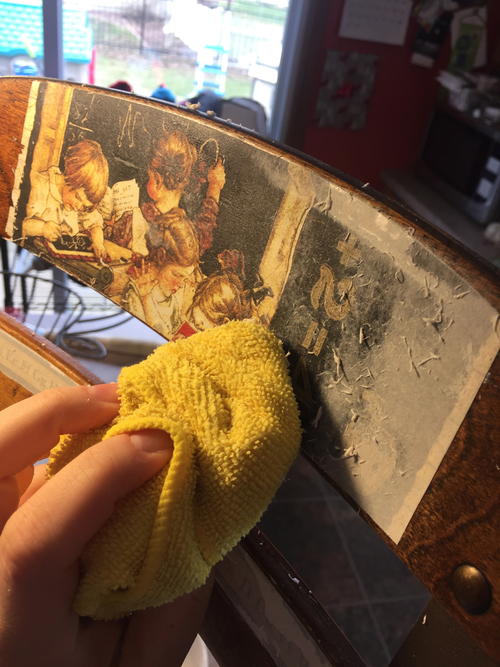
The following day I used a damp sponge to wet the paper, then waited 2 minutes and carefully used my sponge to rub the paper off of my image. I repeated for each image I applied.
-
I let everything dry again and then used sandpaper to distress some of the edges and sections of my transfer (I didn't want it to look too new).
-
Finally I used some watered down brown paint to apply a wash of color to certain areas for an even more aged look.
NotesI'm really glad I tried this fun project, and I'm looking forward to using photo transfer on my future projects!

Read NextHomeschool Room Ideas