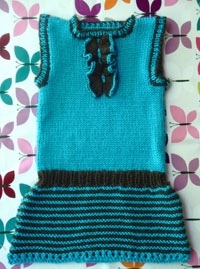
Girly Tuxedo Dress
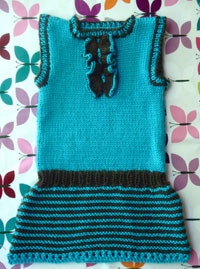
These free baby knit dress patterns from Vickie Howell are girly yet edgy. The ruffle detail adds femininity to this girly tuxedo dress, but the modern stripes and menswear inspired design makes this dress tough enough for the coolest baby.
SIZES: Toddler 6 (12, 18, 24) months/Child’s 2 (4, 6) years
FINISHED MEASUREMENTS:
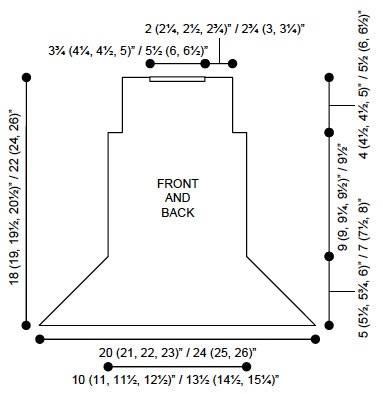
Chest 20 (22, 23, 25)”/ 27 (29, 30 ½)” / 51 (56, 58.5, 63.5)cm/68.5 (73.5, 77.5)cm
Length 18 (19, 19 ½, 20 ½)”/22 (23, 24)”/56 (58.5, 61)cm
Materials:
- Caron International’s Simply Soft® Brights (100% Acrylic, 6oz/170g, 315yds,288m):
- Shown in: #9608 Blue Mint (A) 6 (6, 12, 12)/12 (18, 18)oz / 170 (170, 340, 340)/340 (680, 680)g
- Caron International’s Simply Soft® (100% Acrylic, 6oz/170g, 315yds,288m):
- Shown in: #2603 Forest Floor (B) 6 (6, 6, 6)/12 (12, 12)oz / 170 (170, 170, 170)/170 (340, 340)g
- One pair Size U.S. 8 (5mm) straight needles or size needed to obtain gauge
- Set of U.S. 8 (5mm) double-pointed needles
- Elastic Thread (Optional)
- Sewing Needle (Optional)
- Yarn Needle
GAUGE: In Stockinette stitch, 18 sts and 22 sts= 4” (10cm)
STITCHES USED:
Garter stitch (Garter st):
Knit every row.
Stockinette stitch (St st):
Knit on RS, purl on WS.
FRONT
Skirt
With A and straight needles, CO 54 (58, 62, 66)/70 (74, 78) sts.
Rows 1-2: Knit.
Row 3: K1, *yo, k2tog; rep to last st, k1.
Row 4: Knit.
Row 5-6: Join B, knit.
Rows 7-8: With A, knit.
Continue working in 2 row Garter st stripes until piece measures 5 (5 ½, 5 ¾, 6)”/7 (8, 9)” from beg.
Next Row (RS): Dec 10 sts evenly across row—44 (48, 52, 56)/60 (64, 68) sts.
Next Row (WS): Dec 9 sts evenly across row—35 (39, 43, 47)/51 (55, 59) sts.
Waistband:
Next Row (RS): With B, *k1, p1; repeat from * to end.
Continue in k1, p1 rib for 5 (5, 5, 5)/7 (9, 11) more rows. Fasten off B.
Top
Next Row (RS): With A, k inc 10 sts evenly across row—45 (49, 53, 57)/61 (65, 69) sts.
Next Row (WS): Purl.
Work even in St st for 6 ¼ (6 ¾, 7, 7 ¼)/ 8 (9, 10)”, ending with a WS row.
Shape Armholes
Next Row (RS): BO 4 sts, ssk, knit to end.
Next Row (WS): BO 4 sts, p2tog, p to end--35(39, 43, 47)/51 (55, 59) sts.
Work in St st for 4” (4 ½, 4 ½, 5)/ 5 ½ (6, 6 ½)”more.
Next Row (RS): K9 (10, 11, 12)/13 (14, 15) sts and place on holder for second shoulder, BO 17 (19, 21, 23)/25 (27, 29) sts, k9(10, 11, 12)/13 (14, 15).
Shape Shoulders
Next Row (WS): Working first shoulder, p2togtbl, p7 (8, 9, 10)/11 (12, 13) . Turn.
Next Row (RS): Ssk, k to end.
Next Row: Purl.
Work 4 (4, 4, 4)/6 (6, 6) more rows in St st.
BO.
Join yarn on the WS of opposite shoulder; p2tog, p7(8, 9, 10)/11 (12, 13). Turn.
Next Row (RS): K2tog, k to end.
Next Row: Purl.
Work 4 (4, 4, 4)/6 (6, 6) more rows in St st.
BO.
BACK
Work as for Front until armhole shaping has been completed. Continue in St st for 6 ½ (6 ½, 6 ½, 6 ½,)” / 7 (7, 7)” more.
Next Row (RS): K8 (9, 10, 11)/12 (13, 14), BO 19 (21, 23, 25)/ 27 (29, 31) sts, k8 (9, 10, 11)/12 (13, 14).
Shape Shoulders
Next Row (WS): Working only the first shoulder, p2togtbl, p6 (7, 8, 9)/10 (11, 12). Turn.
Next Row (RS): Knit.
Next Row: Purl.
BO.
Join yarn on the WS of opposite shoulder; p2tog, p6 (7, 8, 9)/10 (11, 12). Turn.
Next Row (RS): Knit.
Next Row: Purl.
Continue, if necessary, until piece measures same as Back.
BO.
FINISHING
Sew shoulder and side seams..
Neck Edging:
With RS facing using B and dpns, pick up 3 sts along every 4 sts or rows around neck edge having an even amount of sts. Join.
Rounds 1-2: Work in k1, p1 rib.
Rounds 3-4: With B, work in k1, p1 rib.
With B, BO in k1, p1 rib.
Armhole Edging
Work same as Neck Edging.
RUFFLE
With straight needles and B, CO 12 sts.
Row 1: Knit.
Row 2: Purl.
Row 3: *K1, m1; rep from * to end.
Row 4: Purl.
Row 5: Repeat Row 3.
Row 6: Purl.
Row 7: Knit.
Row 8: Purl
With A, BO.
With RS facing and B, pick up 12 sts from bottom (shorter) edge of ruffle. Work Rows 2-8 of Ruffle. With A, BO.
Attach ruffle to bodice using A and by sewing down the center with a yarn needle. Note: The chain stitch was used in my version, but any stitch will do. Tack ruffle tips down, if desired.
Using yarn needle, weave in ends.
Optional Waistband Cinching
If you’d like the waistband to have extra shaping so that the top will blouse over, you’ll need to add some elastic thread to it. To do so, turn dress inside out. Measure four pieces of elastic thread that about 30% shorter than the existing waistband. Beg at the first row of waistband, weave a piece of thread under the knit stitches (going over the purl stitches) all the way around. Tie in a knot. Trim. Repeat evenly throughout the length of the waistband, with three remaining pieces of elastic thread.
Read NextBaby Hoodie Knitting Pattern

