Little Arches Socks
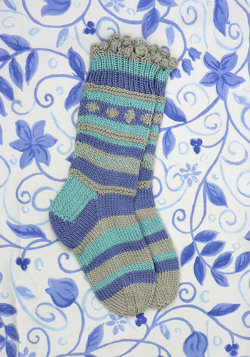
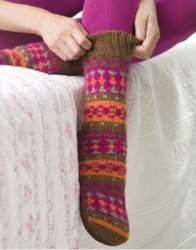
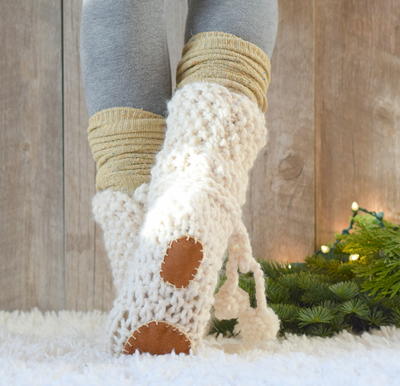
These jolly, warm socks feature bright colors and decorative little balls at the ankle. What's not to love?
Find this and more knit stripe patterns in our "27 Knit Stripe Patterns" article!

MATERIALS
YARN: Naturally Caron.com Spa (75% Microdenier acrylic, 25% bamboo; 3 oz/85 g, 251 yds/230 m ball): 2 oz each MC, A, B = 1 ball each. Shown in: #0005 Ocean Spray (MC), #0008 Misty Taupe (A), #0006 Berry Frappe (B)
One pair size US 6 (4.25 mm) knitting needles, or size to obtain gauge
One set of 4 double-pointed needles (dpn) size US 6 (4.25 mm)
Split ring marker
Bobbins
Yarn needle
SIZE: Adult Medium (Large)
KNITTED MEASURMENTS
Foot: 7 ½ (8 ½)”/19 (21.5) cm
GAUGE
In k1, p1 rib, 28 sts and 32 rows = 4"/10 cm
In Stockinette st, 24 sts and 32 rows = 4"/10 cm
STITCHES USED
Stockinette stitch (St st)
Garter stitch (Garter st)
K1, p1 rib
ABBREVIATIONS
MB (Make bobble): (K1, yo, k1, yo, k1) all in one st, turn, k5, turn, p5, turn, then slip 2nd, 3rd, and 4th sts over the first st to dec to 1 st, turn and place st on right hand needle.
Ssk: Slip 1 st, k next st, psso
Yo: yarn over
NOTES
Use bobbins for the colors used in the charts.
Carry yarns along the rows to prevent loose ends or cut them as you go.
Twist yarns when using a different color.
The first row of the sock with the bobbled edge is done on straight needles, then the stitches are transferred to double-pointed needles.
SOCKS
With A and straight needles, cast on 49 sts.
Cuff: Row 1 (WS): *P1, k1, p1, MB; repeat from * across, ending p1. Note: Make sure bobbles are pushed through to RS.
Place sts on dpn as follows: Needle #1 -- l6 sts; needle #2 -- 17 sts, needle #3 – 16 sts.
Row 2 (RS): With MC, work in k1, p1 rib inc 1 st in last st -- 50 sts.
Join into rnd being careful not to twist sts, placing marker at beg of rnd.
Work in k1, p1 rib for a total of 8 rnds.
Join B and work 7 more rnds in k1, p1 rib.
Ankle: Rnds 1 and 3: With A, knit.
Rnds 2 and 4: With A, purl. Note: Rnds 1-4 are Garter st rnds.
Rnds 5-8: With MC, work in St st.
Rnds 9-14: K1 with B, work Chart 1 repeat around to last st, k1 with B.
Rnds 15-18: With MC, work in St st.
Rnds 19-22: With A, work in Garter st.
Rnds 23 and 24: With M, work in St st.
Rnds 25-28: With B, work in St st.
Rnds 29-34: K1 with A, work Chart 2 around to last st, k1 with A.
Rnds 35-40: With MC, work in St st.
Rnds 41-44: With A, work in Garter st.
Sock should measure approximately. 8”. Break off yarn colors.
Heel Flap (worked back and forth in rows):
Worked on 24 sts with B; put rem 26 sts on an extra needle to be worked later.
Row 1 (RS): *Sl 1, k1; repeat from across.
Row 2: Sl 1, purl across.
Repeat Rows 1 and 2 for 24 rows, ending with p row.
Turn Heel:
Change to MC.
Row 1 (RS): Sl 1, k12, k2tog, k1, turn.
Row 2: Sl 1, p3, p2tog, p1, turn.
Row 3: Sl 1, k4, k2tog, k1, turn.
Row 4: Sl 1, p5 p2tog, p1, turn.
Row 5: Sl 1, k6, k2tog, k1, turn.
Row 6: Sl 1, p7, p2tog, p1, turn.
Row 7: Sl 1, k8, k2tog, k1, turn.
Row 8: Sl 1, p9, p2tog, p1, turn.
Row 9: Sl 1, k10, k2tog, k1, turn.
Row 10: Sl 1, p11, p2tog, p1, turn.
There should be 14 sts rem.
Shape Gusset:
With RS facing and MC, knit across to center of heel (7 sts), place marker, using a spare dpn (needle #1), knit across rem 7 sts; pick up 12 sts along side of heel and k1 st in gusset corner (20 sts); with needle #2, knit across 26 instep sts; and with needle #3, pick up and k1 st in gusset corner, pick up 12 sts along other side of heel. then knit rem 7 heel sts (20 sts) -- 66 sts.
Note: There should be 20 sts each on needles #1 and #3 and 26 sts on needle #2. Decs will now be worked at end of first needle and beg of 3rd needle for a total of 9 rnds in MC.
Rnd 1: Knit to the last 3 sts on needle #1, k2tog, k1; knit across instep on needle #2; on needle 3, k1, ssk, knit to end.
Rnd 2: Work even.
Repeat Rnds 1 and 2 until you there are 12 sts on needles #1 and #3, and 26 sts on needle #2 – 50 sts.
Continue in St st in color sequence as follows:
5 rnds with B.
7 rnds with A.
4 rnds with MC.
7 rnds with B.
3 rnds with A.
3 rnds with MC.
3 rnds with B.
Continue in this color sequence until foot sections measures (when slightly stretched) 2" less than desired length of foot, dec 1 st at each end of instep on last rnd (24 instep sts) --48 sts.Break off all yarn colors but A.
Shape Toe:
Rnd 1: Knit to last 3 sts on needle #1, k2tog, k1; on needle #2, k1, ssk, knit to last 3 sts, k2tog, k1; on needle #3, k1, ssk, knit to end.
Rnd 2: Knit even.
Repeat Rnds 1 and 2 until 6 sts rem on needles #1 and #3, and 12 sts on needle #3 – 24 sts.
Repeat only Rnd 1 until 8 sts rem.
Break yarn, leaving a 5" tail.
Using yarn needle, thread yarn tail through rem sts and pull tight to fasten. To make toe finish firmer, run the yarn through the sts again.
Weave in all ends and steam lightly.

Read NextCable Yoga Socks
Your Recently Viewed Projects
RevDi
Feb 26, 2011
P.S. If you are looking for an easy sock pattern on this site, I would try http://www.favecrafts.com/Knit-Socks-and-Slippers/Family-Socks-Knitting-Patterns
RevDi
Feb 26, 2011
I wouldn't recommend these socks for a beginner as you have to switch colors back and forth, and an experienced knitter is reporting problems with the bobbles at the top edge of the sock. In answer to your questions, a split ring marker is a marker that can be taken off and on a knitting needle (or crochet stitch) to mark your place. It is usually made of a single piece of plastic that overlaps, like a capital letter "G" collapsed on itself. Bobbins are items shaped like embroidery floss cards that hold small amounts of yarn. This makes it much easier to switch back and forth between yarn colors when knitting a sock like the one pictured. Imagine trying to do so with full skeins of yarn! Both these items can be found at any yarn, needlework, craft, or craft store. I hope this information is helpful. Good luck!
Catdabrat
May 13, 2010
I am wondering if anyone here has made these socks with this pattern as I am not able to even get past the first row other than the cast-ons My problem is with the bobbles on the cuffs I have been knitting for decades and used to make Christmas stockings so I do have some experience But I just cannot make these bobbles work out like the instructions say I always end up with an extra stitch I have seen instructions for other bobbles but they work with stitches This pattern says to work with Notice the bobble-making instructions k turn p turn then slip nd rd and th sts over the first st to dec to st turn and place st on right hand needle ----- How does this decrease down to stitch I always am left with And even if I turn my needles every time the pattern indicates…Read More that last step causes me to end up with the bobble on the wrong needle I am trying to get a hold of the designer to ask her but thought maybe somebody here might have tried it Thanks
almi
Feb 23, 2010
I have a question for you can a beginner make these socks,and what is a split ring maker and bobbins and what are they used for. I have been looking for a beginners sock pattern, so thank-you. candy
Report Inappropriate Comment
Are you sure you would like to report this comment? It will be flagged for our moderators to take action.
Thank you for taking the time to improve the content on our site.

