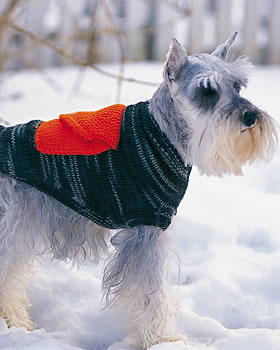
Camouflage Dog Coat
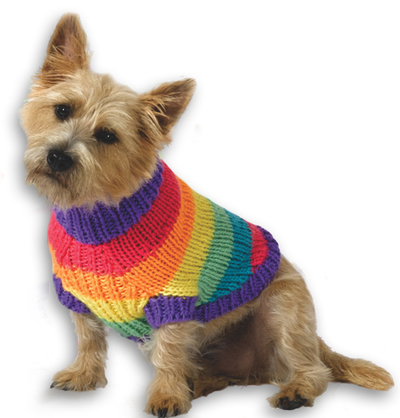
Keep your dog warm with this adorable camouflage dog coat with cargo pockets from Bernat Yarns! This free knitting pattern shows you how to make a quick and easy coat for any size dog. This easy dog coat is great for playing and walking outdoors in the wintertime...and the little cargo pocket is perfect for storing your keys as you two walk in the park. Dogs of all kinds will love the warmth of this fun seasonal knit accessory.

Materials:
- 1 (2, 2, 2) ball(s) Bernat Camouflage Yarn, or color of your choice (MC)
- 1 (1, 1, 1) ball contrasting yarn, color of your choice (A)
- 4mm (US 6) knitting needles
- 5mm (US 8) knitting needles
- 4mm (US 6) circular knitting needles
- 4mm (US 6) double pointed knitting needles
- Button
Gauge: 18 sts and 24 rows = 4" [10 cm] in stocking st with larger needles.
Instructions:
Sizes: S (M-L-XL)
To fit dog chest measurement: 10 (13-16-24)" [25.5 (33-40.5-61) cm].
The instructions are written for smallest size. If changes are necessary for larger sizes the instructions will be written thus ( ).
-
With MC and smaller needles, cast on 40 (46-58-82) sts.
-
Beg with a WS row, knit 9 rows inc 4 sts evenly across last row. 44 (50-62-86) sts.
-
Change to larger needles and beg with a knit row, work 2 rows in stocking st.
-
Next row: (RS). Inc 1 st in first st. Knit to last 2 sts. Inc 1 st in next st. K1. 46 (52-64-88) sts.
-
Cont in stocking st, inc 1 st at each end of needle, as before, to 50 (60-72-104) sts, then on following alt rows to 54 (68-82-122) sts.
- Purl 1 row.
Leg Openings
Note: All Leg sections are worked at the same time using separate balls of yarn for each section.
-
Next row: (RS). K5 (5-7-11). Cast off 4 (6-6-10) sts. K36 (46-56-80) (including st on needle after cast off). Cast off 4 (6-6-10) sts. Knit to end of row.
-
Beg with a purl row, work for 1 (1 1/2-1 1/2-2 1/2) ins [2.5 (4-4-6) cm] in stocking st, ending with purl row.
-
Joining row: K5 (5-7-11). Cast on 4 (6-6-10) sts. K36 (46-56-80). Cast on 4 (6-6-10) sts. Knit to end of row. 54 (68-82-122) sts.
- Cont even until work after neckband measures 4 1/2 (5 1/2-7-10)" [11.5 (14-18-25.5) cm], ending with purl row. Place a marker at each end of last row.
Back Shaping
-
Cast off 6 (7-9-13) sts beg next 2 rows. 42 (54-64-96) sts.
-
Next row: (RS). Sl1. K1. psso. Knit to last 2 sts. K2tog.
-
Next row: Purl. Rep last 2 rows to 26 (36-42-66) sts.
- Cont even until work after neckband measures 10 (12 1/2-15 1/2-21) ins [25.5 (32-39.5-53.5) cm], ending with purl row. Leave sts on a spare needle. Sew neck seam to markers.
Back Ribbing
-
With RS facing, MC and circular needle, pick up and knit 33 (37-51-67) sts along body from marker to back. K26 (36-42-66) from spare needle dec 3 (3-5-5) sts evenly across. Pick up and knit 33 (37-51-67) sts along opposite side of body to marker. 89 (107-139-195) sts.
-
**Join in rnd, and placing a marker on first st, proceed as follows:
-
Next rnd: Purl.
-
Next rnd: Knit.
- Rep last 2 rnds 3 times more. Cast off purlwise.**
Leg Edging
- With RS facing, MC and first double pointed needle, pick up and knit 7 (9-10-12) sts. [With next double pointed needle pick up and knit 7 (9-10-12) sts] twice. 21 (27-30-36) sts. Work from ** to ** as given above.
-
With A and larger needles, cast on 25 (25-30-30) sts.
- Proceed in stocking st for 5 (5-6-6) ins [12.5 (12.5-15-15) cm], ending with a purl row. Cast off.
Pocket Flap
-
With A and larger needles, cast on 12 sts.
-
1st row: (WS). P3. Knit to end of row.
-
2nd row: Knit to last 4 sts. Inc 1 st in next st. K3.
-
Rep last 2 rows to 23 (23-26-26) sts.
-
Next row: (WS-buttonhole row). P3. K2. yfwd. K2tog. Knit to end of row.
-
Next row: Knit to last 5 sts. K2tog. K3.
-
Next row: P3. Knit to end of row.
-
Rep last 2 rows to 12 sts, ending with a purl row. Cast off.
- Sew Pocket to back. Sew top edge of Pocket Flap in position 1/2 inch [1 cm] above top pocket edge. Sew button to Pocket to correspond to Pocket Flap buttonhole.
Read NextColordivide Blanket
Your Recently Viewed Projects
srhamya 5215331
Jul 09, 2015
hi! the description is not enough to be applied. please take some more pictures for each steps. really thanks!
Melissa Ryan
Nov 15, 2012
Who's made this cute coat for their dog? We'd love to see pics!! (www.facebook.com/favecrafts)
Report Inappropriate Comment
Are you sure you would like to report this comment? It will be flagged for our moderators to take action.
Thank you for taking the time to improve the content on our site.

