Altered Art Mason Jars
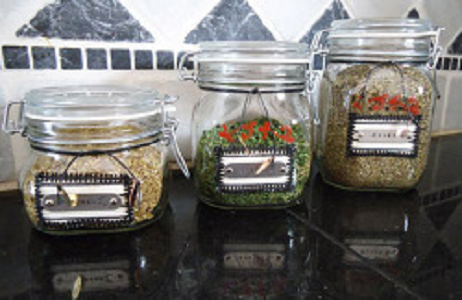
Save glass jars and turn them into Altered Art Mason Jars from Theresa Cifali with can serve as catchall for spices, grains and more. Use a variety of supplies and materials to help your altered art ideas come to life. Use jars you already have to cut down on costs.

Materials:
- ImpressArt Metal Alphabet Stamps, Newsprint, upper and lowercase
- ImpressArt Design Stamps: Leaf Right, Vine
- ImpressArt Metal Stamping Hammer
- ImpressArt Steel Stamping Block
- ImpressArt Stamp Straight Tape
- ImpressArt Assorted Metal Blanks
- ImpressArt 2-hole punch
- 3 glass mason jars
- Stripped 3/4” twill ribbon
- 1/8” ribbon or trim of your choice
- Leather cord
- Brads
- Acrylic paint, black
- Q-tips
- Paper towel
- Hot glue gun
- Acrylic paint for glass
- Small brushes
- Stencil of your choosing
- Golden’s heavy gel medium
- Sharpie
Instructions:
- Wash the mason jars. Allow them to dry thoroughly.

- Gather your tools.

- Stamp one of each of the long metal tag blanks: Basil, Oregano, Parsley.

- Stamp the Right Leaf Stamp twice after each word.

- With a Q-tip, smear some black acrylic paint over each word.

- Then wipe off with a paper towel until the surface area is clean.


- Repeat this process with the small metal tags using the Vine design stamp on the front and the back of the metal tag. Set those aside for later.
- Mark the ends of each long metal tag with a Sharpie.

- Use the 3/32” side of the 2-hole punch to make holes where you marked the long metal tags.
- Fasten a brad to each hole.

- Adhere your stencil to the large mason jar.
- Apply your glass paint. Follow the directions for drying time.

- Remove the stencil.

- Repeat this process on the medium size mason jar.
- Cut two 2 1/2” pieces of ribbon per jar.

- Adhere the two pieces of ribbon, one next to the other to the mason jar with Golden’s gel medium to create a panel. Repeat on other jars.

- Use hot glue to add trim around the ribbon panels of each jar.

- Use the hot glue to adhere the long metal tags to each jar.

- Tie leather cord around the neck of the mason jar. Thread the end of each cord through the hole of a small metal tag. Tie a knot at the end of the cord.

Read NextUpcycle Jar to Flower Vase
Your Recently Viewed Projects
flowergirl
May 22, 2018
Lovely! Love all the different crafting techniques in this craft. Mason jar crafts are pretty awesome, they are a chic way to store anything from spices in your kitchen to you're crafting items. This project combines letter punching, something I really love to incorporate in my jewelry projects and painting.
princess6860504
Feb 12, 2018
The repurposed jars look so vintage country chic! This is quite a bit of work for someone inexperienced with these materials, as I am. But I will say that she has made it look easy and fun! I am good at painting, so I might even be able to do the painting free hand.
Marilyn B
Jun 05, 2017
Nice project, and you could even look around at garage or estate sales for different styles of mason jars or similar jars to save further on costs. If you are artistically gifted, you could even free form the scrolled designs and even the label signs themselves. Fill these with some fixings for cookies or some seeds to be planted for an extra special gift.
Ask93 7929298
Jun 12, 2016
These are some very cute jars. I like the idea of the metal tags. I would also like to see some pictures in frames in place of the labels as another way to identify the contents. Another thing I might recommend is to make holes in the metal labels and hand them like tags from the necks of the jars.
Catl8dy
Jan 05, 2013
Great idea, love the tag and stencil. I would punch holes on each end of the tag and attach the tag to the jar with wire and add some beads, or just run that cord you have around the neck of the jar, through the tag and let it hang...then you can remove it to wash the jar periodically. The cloth and lace would be ruined when washing unless you're very careful.
Catl8dy
Jan 05, 2013
I LOVE the tag, great idea. I would put it around the jar with metal wire so you could remove it to wash the jar periodically...add some beads to the wire :-) it periodically
Report Inappropriate Comment
Are you sure you would like to report this comment? It will be flagged for our moderators to take action.
Thank you for taking the time to improve the content on our site.

