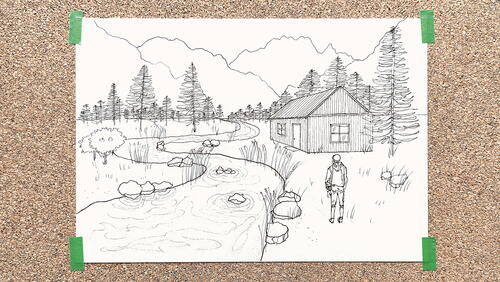
Sketching a Natural Landscape

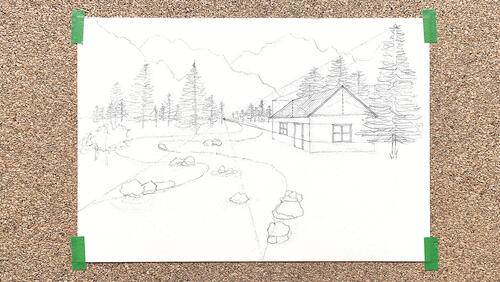
Now, I will show you how to draw your very first woodland sketch. Remember that it does not have to be perfect. Perfection is only achieved by repetition and practice, so right now, just focus on understanding and having fun. This sketch will allow you to explore the power of trusting your container boxes and planes when experimenting with organic lines as you create a meandering stream, pine trees, a cozy cabin and a hiker observing the whole scene.
INSTRUCTIONS
-
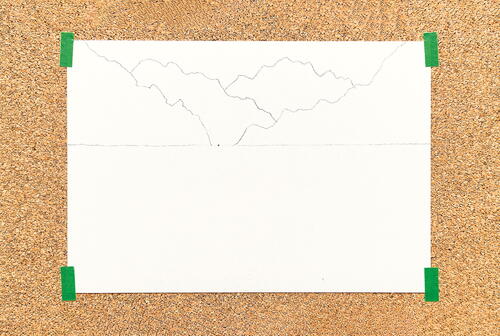
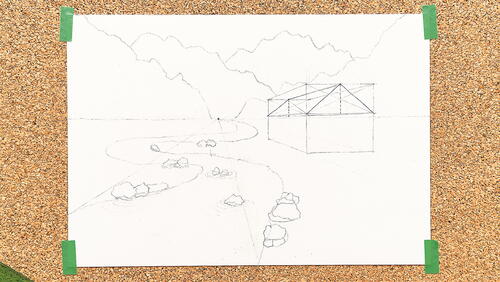
Draw the horizon line slightly above the middle of the page and place the vanishing point a little bit to the left of the center. Then draw a couple of steep mountains to either side of the vanishing point. Mountains do not have a fixed shape so there is no right or wrong way of doing this. Just do wavy lines with peaks that keep going upward. The mountains are going to form a valley between them, so keep that in mind as you draw. Let your first mountains dip down to either side of the vanishing point; the gap between them represents the valley. Then draw a couple more mountains behind them as if the valley continues.
-
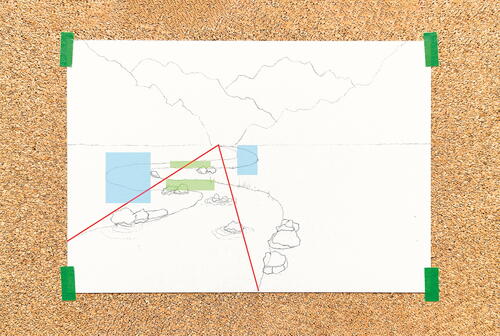
Draw a couple of straight lines (red) coming from the vanishing point toward the left corner of the paper. Use them as a reference to draw a pair of winding lines representing a stream. As the stream gets closer to the observer, the distance between the banks should be progressively bigger and match that of the two straight lines. This is the same method you would use to draw a curvy road or a hiking path.
Note that when you draw something like this, you will always see the sections facing the observer directly (shaded in blue) wider than those that run across (shaded in green). This is an effect of perspective and the same reason you always see a horizontal square plane wider than deeper. Now add some stones at the stream’s shore to create ambience. -
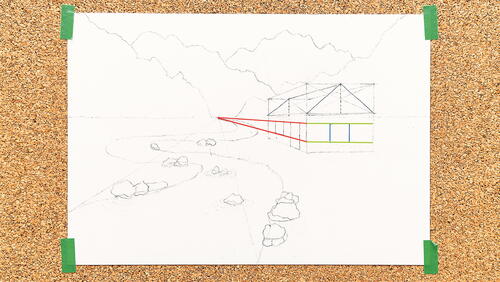
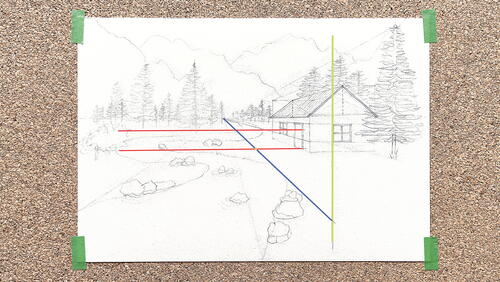
Now you will put a cabin in the empty space on the right. Draw a rectangular box and a triangular box exactly on top of it (Picture 3a). Next, put a door-shaped plane (vertical rectangle) on the left side of the bottom box (Picture 3b). The lower side of that plane should be aligned with the bottom line of the cabin. Now draw a squared plane at its left side aligned with the top of the door, which will become a window. Add another window on the side of the box facing the observer.
I want both windows to be the same size and height. To transfer the height from one side of the container box to the other, draw a couple of lines from the vanishing point that touch its top and bottom borders and go all the way to the corner of the cabin (red in Picture 3b). In the corner, wrap them around by continuing them horizontally on the front-facing plane (green). Add a couple of vertical lines (blue) to complete the square, and now you have two identical windows on both sides. The cabin is the first object with an identifiable size in the drawing, so it is going to determine the scale of every other object. -
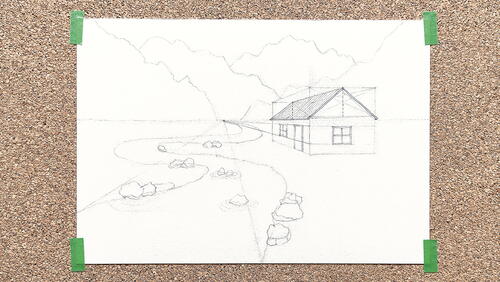
Now that the basic shape of the cabin is done, add some details. Add double lines in the planes you just drew to create frames for the door and windows. Also, draw a double-lined cross on each window to give them a rustic cabin vibe. In the roof, add double lines on the front to give it volume and extend it a little bit past the front and back walls so that it looks more real. Then, fill it with lines parallel to the inclination of the roof imitating boards or straw.
-
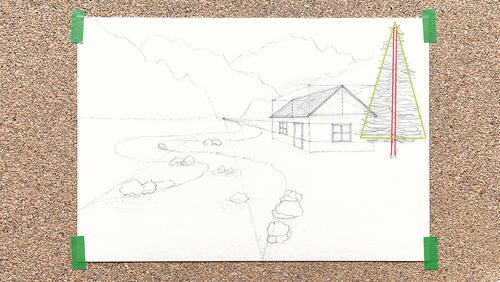
Next, decorate the scene with some pine trees. Draw the first one in front and to the right of the cabin. Use its size as reference and assume it is at least double the height of the top of the roof. Start with a couple of vertical lines (red) that represent the trunk (Picture 5a). Then draw wiggly, shaky lines coming in and out of it in a triangle-shaped manner (green) all the way to the top. Now, fill the landscape with many more trees using the repetition of objects technique (Picture 5b).
-
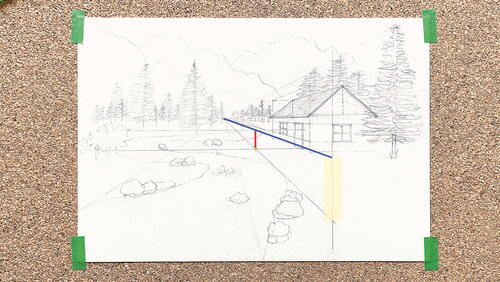
The finishing touch of the drawing is going to be a human figure. How do you decide the size of a person (or any other object with an identifiable size) in an almost finished sketch? Pay close attention because this technique I am about to show you will become one of your most treasured secrets. The first thing you need to do is find an object that you can easily compare with a human. In this case, I would recommend the door. Next, sketch a couple of horizontal lines with the assumed height in comparison to it (red in Picture 6a). The average person is roughly three quarters of a standard door.
Now, draw a vertical line in the place where you want the person to be (green in Picture 6a). Then draw another line that starts somewhere in that vertical where you want their feet to be touching the ground and goes all the way to the vanishing point (blue in Picture 6a). That line is going to intersect with the lower of the two horizontals that you made first. From that point (green in Pictures 6a and 6b), draw a vertical line (red) to the upper horizontal line (Picture 6b). From there, draw a line from the top of your new vertical (red) that goes to the vanishing point and extends all the way to the vertical line of the initial position you chose for the person (blue in Picture 6b). The distance between those two lines (yellow in Picture 6b) determines their height in that particular position. -
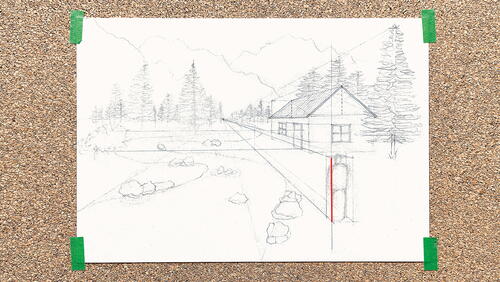
Using that vertical as the first corner, draw a box that contains the person. Inside of it, draw ellipses dividing the person into their most basic parts.
-
Now you can use those ellipses as a guide to draw the person’s details (Picture 8a). Finally, ink the whole drawing when you are happy with everything (Picture 8b).
You are now ready to get out there, draw an awesome natural landscape and leave your friends’ minds blown!

Credit:
Reprinted with permission from Foolproof Perspective Drawing by Roberto Bernal. Page Street Publishing Co. 2024. Photo credit: Roberto Bernal.
Read NextSteampunk Mirror Makeover