Beautiful Mom Frame
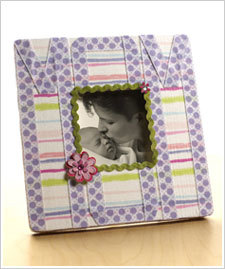
Use this Plaid project as a guideline to a great Mother's day photo frame. She'll love the design and the photo you put in it. 15 steps to perfection, start crafting.

Materials:
- 1184 - FolkArt ® One Stroke™ Brushes - Flat, 1"
- 20503 - Apple Barrel ® Colors - White, 2 oz.
- CS11218 - Mod Podge ® Fabric, 8 oz.
- Square wooden picture frame (at least 3.5 x 3.5) with small opening for photo
- Light grit sand paper
- Pencil
- Scissors
- Square piece of fabric (to fit frame size)
- Ribbon
- Rick rack (optional)
- Embellishments
- Glue gun
Instructions:
-
Lightly sand top and sides of frame to make a smooth surface for fabric to be glued onto.
-
Paint frame on front and sides with a base coat of white.
-
Paint inside and outside of frame with a contrasting paint to match fabric or ribbon.
-
Lay fabric on hard surface (right side down), lay frame (front down) on fabric and lightly trace around frame outside and inside with a pencil.
-
Cut fabric carefully, and make sure that it fits on front of frame evenly.
-
Using paint brush, apply one even coat of Fabric Mod Podge onto front of frame.
-
Lay fabric on frame and smooth out wrinkles and air bubbles. Let dry.
-
Take ribbon and cut six strips, same length, for the vertical parts of MOM.
-
Cut the strips for the O in MOM out of the photo part of the frame.
-
Cut four short strips to complete the M’s in MOM.
-
Apply Mod Podge to the six strips and place onto fabric (trim edges if necessary).
-
Repeat for remainder of the M letters to complete the word MOM. Let dry.
-
Apply rick rack around photo part of frame with a hot glue gun (optional).
-
Using Mod Podge once more, brush and even coat over entire frame to seal. Let dry.
-
Apply embellishments wherever you desire (optional).
-
Insert photo, display, and ENJOY!
Read NextOdds and Ends Kitchen Fairy


