Mother's Day Bird Frame
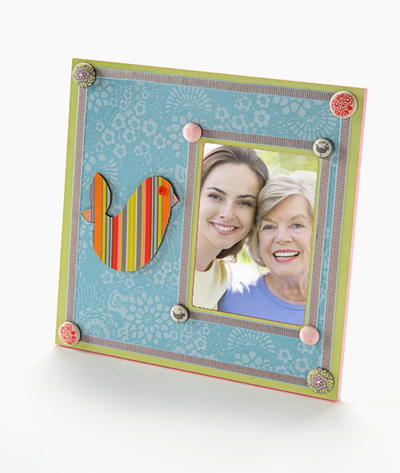
 Create a pretty picture frame for Mom this Mother's Day with this decoupage craft from Amy Anderson. A bird silhouette adds a fun touch to this scrapbook-paper picture frame.
Materials:
- 438 - FolkArt ® Acrylic Colors - Ballet Pink, 2 oz.
- 526 - FolkArt ® Acrylic Colors - Soft Apple, 2 oz.
- 940 - FolkArt ® Acrylic Colors - Coffee Bean, 2 oz.
- CS11201 - Mod Podge ® Gloss, 8 oz.
- Plaid ® Wood Surfaces - Mini Silhouettes - Bird
- Amy Butler Scrapbooking Collection by K&Company – Lotus Tea Box Paper Stack & Brads
- Craft Glue
- Painter’s Tape
- One small orange button
- Coordinating ribbon
- Craft knife & mat
- Wire cutters
- Wood frame – 12” x 12” with 5” x 7” opening
Find this Mother's Day project and 18 other Mother's Day crafts in the Mother's Day Crafts: Blogger Edition 2010 eBook. This free downloadable guide is perfect for anyone who wants to show how much they care. Make a gift for a mom or mother figure in your life using these creative craft project ideas.
Instructions:
- Remove the frame stand from the back of the frame and paint Coffee Bean. Paint one of the bird mini wood pieces with Coffee Bean as well. Allow both to dry.
- Basecoat back of the frame Ballet Pink including the sides. Allow to dry.
- Use the painter’s tape to section off the back of the frame (and the sides). Paint the front of the frame with Soft Apple and allow to dry.
- Select one sheet of scrapbooking paper. Use the craft knife and mat to trim this paper down approximately 1/2" on each side. Also trim the area around photo window.
- Select a second, coordinating sheet of scrapbooking paper and trace the bird on the back of it. Use the craft knife and mat to trim the piece of paper to fit.
- Apply the piece of paper from step 4 to the frame using the Mod Podge. Allow to dry and then coat the entire frame (and frame stand) with Mod Podge. Apply a second coat and allow to dry.
- Apply the piece of paper from step 5 to the bird piece using Mod Podge. Allow to dry and then apply a second coat.
- Cut the coordinating ribbon to fit around the edge of the frame. Glue down using the craft glue.
- Clip off the back of the brads using the wire cutters. Attach the brads at each corner of the frame and window using the craft glue.
- Glue down the bird piece with the craft glue. Glue the button as the eye to the bird.
- Allow the project to dry for at least 24 hours before using.
Find additional cute decoupage projects in our collection of 33 Fabulous Decoupage Ideas Plus 3 Helpful Tutorials!


