New Baby Banner
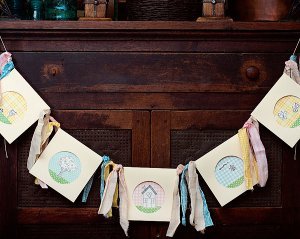
Welcome a new little one home with this New Baby Banner. Made using a random assortment of materials, this banner is great for a DIY baby shower. Cute baby ideas like this are perfect for little girls and boys alike, and can easily be used to decorate a nursery or bedroom after the baby shower is over.

Materials:
- Three 12 x 12 inch sheets of cardstock
- White cardstock
- Stamping ink
- Stamp set
- Variety of patterned papers
- Fabric scraps for tearing into strips
- Fuse Creativity System® Starter Set
- Micro-Tip® Softgrip® Scissors (No. 5)
- LED SureCut™ Folding Rotary Paper Trimmer (12")
Instructions:
-
To make this garland, I first cut 3 sheets of 12 x 12 inch cream colored cardstock into 12 x 6 inch pieces and fold 5 of them in half.

-
To cut the circular opening, I centered the cardstock strip over the medium cutting plate and then centered the die, upside down, over the cardstock and ran it all through the Fuse Creativity System®.

-
Next, I placed 5.75 x 5.75 inch pieces of patterned paper inside the folded sections of cardstock and ran a long length of twine through each of the sections placing it near the fold. After adjusting the panels to have an equal amount of space between them, I tore 1 inch wide strips of fabric and tied them to the twine between the panels.

-
A set of stamps and black ink were used on white cardstock and then cut out using a pair of Fiskars scissors.

-
A 1.75 inch x 5.75 inch strip of green patterned paper was added to the bottom inside of each panel to appear as grass and the cutout stamped images were adhered. I then applied adhesive around the perimeter of the panels and sealed them closed.

-
The panels and fabric strips were adjusted as needed.

- This is a project that I would have been thrilled to have made as a child because it combines several mediums, several techniques, and can really stand out as a decor piece in a home, yet it wasn't overwhelming and was easily completed in one art session!
Read Next75 Homemade Baby Gift Ideas

