Porcelain Ornament Trio
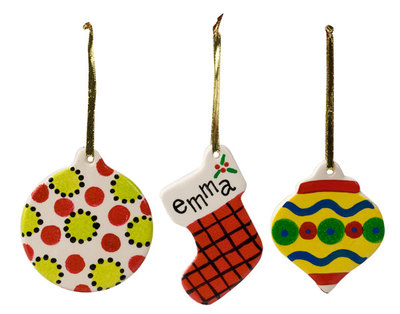
Create this threesome of special holiday ornaments by painting porcelain shapes.

Materials:
- Foam plate
- DAG36 - True Blue
- DAG67 - Black
- DAG227 - Bright Yellow
- DAG230 - Festive Green
- DAG235 - Citron Green
- DAG265 - Tuscan Red
- #6 chisel blender brush
- #2 liner brush
- #8 shader brush
- 1/4" and 3/4" round foam pouncer brushes
- 4" circular porcelain ornament, Michael's, #10453445
- 4" porcelain stocking ornament, Michael's, #10455120
- 4" ornament shape, Michael's, #10453445
Instructions:
Preparation: Remove all labels and hangers before painting.
CIRCLE ORNAMENT:
Use large pouncer and Citron Green to stamp large dots over ornament; let dry.
Use small pouncer and Tuscan Red to stamp small dots in spaces; let dry.
Use end of liner brush handle dipped in Black to paint small dots around edges of Citron Green dots. Let dry.
STOCKING ORNAMENT:
Use large pouncer dipped in Tuscan Red to stamp paint evenly over stocking below cuff; let dry.
Use liner brush and Black to paint lines for plaid over Tuscan Red area of stocking and name on cuff. Let dry.
Use end of liner brush handle dipped in Tuscan Red to dot on berries on cuff near hole; let dry.
Use liner brush and Festive Green to paint lines for holly leaves around berries and let dry.
ORNAMENT SHAPE:
Referring to photo for placement, use small pouncer and Bright Yellow to stamp over center area of ornament. Let dry.
Use shader brush and Tuscan Red to paint lines for top and bottom band of ornament; let dry.
Referring to photo for placement, use large pouncer and Festive Green to stamp three dots across center of Bright Yellow area and let dry.
Use small pouncer and Tuscan Red to paint small dots between Festive Green ones; let dry.
Use chisel blender and True Blue to paint wavy line above and below row of dots; let dry.
Read NextClear Bulb Embellished

