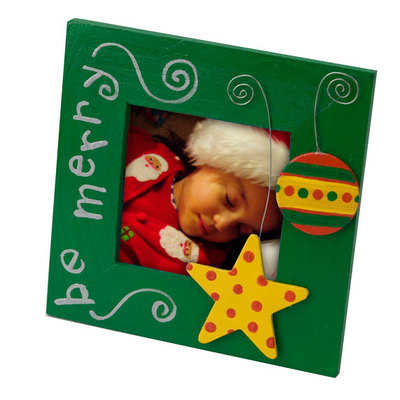
Be Merry Frame
Creating this painted, holiday photo frame is child's play with a few paints.
by DecoArt.com

Materials:
DecoArt Products Required
Americana Acrylics
- DAO10 - Cadmium Yellow (transparent)
- DA129 - True Red
- DA230 - Festive Green
Dazzling Metallics
- DAO70 - Shimmering Silver
Americana Spray Sealers
- DAS12 - Americana Gloss Spray
Supplies
- Unfinished wood pieces: 2" star; 1.25" circle
- 1/4" and 3/4" flat brushes
- Short liner brush
- 24-gauge silver craft wire
- Wire cutter/curling tool
- Lo-temp glue gun and glue sticks
- 2.5" x 2.5" Tyler's wood frame, Provo Craft #13-3123
Steps:
Preparation: Remove any stickers, inserts, or tags from surfaces before beginning.
- Use Festive Green to paint frame; let dry.
- Use Cadmium Yellow to paint star and let dry.
- Use True Red to paint circle; use end of paintbrush dipped into True Red to paint dots on Cadmium Yellow star. Let dry.
- Use 1/4" flat brush and Cadmium Yellow to paint stripe across True Red circle; let dry.
- Use liner brush and Festive Green to paint line above and below Cadmium Yellow stripe.
- Use end of paintbrush dipped into True Red to dot on Cadmium Yellow stripe; repeat with Festive Green, alternating colors. Let dry.
- Glue one end of 4 1/2" wire to back of ornament shape; glue end of 6" wire to back of star. Use curling tool to curl ends of wire into spiral.
- Refer to photo for placement and glue ornament shapes to frame.
- Use liner brush and Shimmering Silver to paint words "be merry" and wavy lines on frame; let dry.
- Spray frame with Americana Gloss Spray Sealer and let dry.
Read NextDIY Bike Planter Garden Craft

