This project was submitted by one of our readers, just like you.
Cricut Summer Lantern 3d Svg
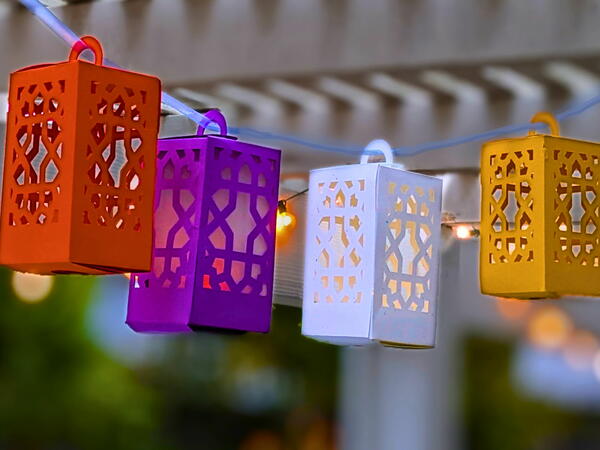
"Make a Moroccan-inspired paper lantern for your Summer gatherings with this template for Cricut, Silhouette or a printer and craft knife. This template cuts cardstock to create a 6-inch tall by 2.5-inch wide paper lamp that securely holds an LED tealight. . The versatile design makes a great home decor or patio accent. Crafted for simplicity, this easy Cricut project ensures precise cuts and a professional finish, suitable for crafters of all levels. The Template Includes: • Lantern • Vellum Insert File Formats: SVG, Studio3, PNG"
Primary TechniquePaper Crafts

Materials List
- Plain 12 X 12-inch cardstock in your choice of color.
- White or amber 8.5 X 11-inch vellum.
- Your favorite paper glue and/or double-sided tape.
- Your favorite cutting tool: Cricut, Silhouette, or Craft Blade.
Instructions
-
Preparation and Cut Cut using the appropriate cardstock settings for your machine. I used a Cricut Maker 3 and used American Crafts 80-pound Precision textured color cardstock. NOTE for Cricut users: The grouped design should measure 11.3 inches wide by 15.33 inches tall. If it uploads at a smaller size, you may want to enlarge it before ungrouping it. To use with a Cricut Scoring Tool: 1. Ungroup all the objects. Then ungroup each separate object with solid score lines. 2. Select the score lines and re-align them to their objects, if necessary. 3. Under “Operation,” set the score lines to “Score”. Lines will now appear dashed. 4. One by one, select each object and its score lines and “attach” them. Make it and follow your machine’s instructions for tools.
-
Assemble Fold the Top and Sides 1. Place the Lantern piece face-down on your work surface. 2. Fold the scores of the Hanger Flaps with “Valley” folds. 3. Also fold the scores of the Hangers with “Valley” folds. 4. Then fold the Hanger Rings backward, with “Mountain” folds. 5. With the Lantern piece still face-down, fold the four sides with “Valley” folds. 6. Also fold the two Side Connector Tab scores with “Valley” folds.
-
The Tealight Holder 7. Fold the first score of the Tealight Cover (at the base) with a “Valley” Fold. 8. Fold the second and third scores of the Tealight Cover with “Mountain” folds. 9. Pull the Tealight Cover up toward the lantern and glue the first section to the inside of the lantern up to the second score. 10. Place an LED Tealight “flame” into the circle of the Tealight Cover and secure it in place with some double-sided tape or adhesive, as in Figure 2. 11. Fold the scores of the Base Closures with “Valley” folds.
-
Connect the Sides 12. Connect the two Side Connector Tabs by placing Side Connector Tab 1 into the slot of the Side Connector Tab 2, as in Figure 3. If you like, you can glue them together to give them extra strength.
-
Connect the Base 13. Fold the Tealight Base over the bottom or the LED tealight, as in Figure 4. 14. Fold the Base Closure 1 over the Tealight Base. 15. Fold the Base Closer 2 over last and insert its flap into the slot of Closure 1.
-
Insert the Vellum 1. Fold the Vellum Insert at the scores all with the same fold, to make a box. 2. Slide the insert into the lantern all the way in so that it sits on the Tealight Cover.
-
Connect the Top 16. Connect the Top by bringing the two Hangers together over the lantern. 17. Pull the rings of the Hangers through one Hanger Flap then through the other Hanger Flap.
-
Place on a table or hang outdoors for a special Summer decoration. You may want to use Flameless TeaLights Candles with Timer from Amazon, or a similar product. You only turn them on once and they will turn off after 6 Hours and then automatically come on again each evening in 24 Hour Cycles. For more paper crafting designs see: https://bellacartadesign.com/
Read NextWindmills in the Country


