Hawaiian Stamped Aloha Invite
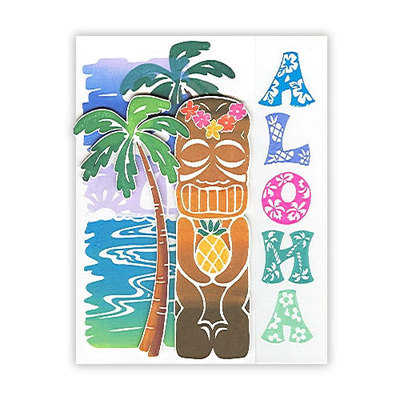
Invite people to a summer luau or send greetings from vacation with a Hawaiian Aloha stamped card from Posh Impressions. You'll love the extra details in the "Aloha" stamp.

Materials:
- Aloha stamp set
- Summer stamp set (If you wish, make a card using only one of the sets, by self adjusting the directions below.)
- Dee Gruenig brush art marker set plus a single bottle green marker. Or, order only these suggested colors of true blue, lavender, posh pink, turquoise blue, salvia blue, grass green, bottle green and butter yellow.
- Blending Blox (shades of periwinkle and shades of brown). Shades of gray can be used in place of brown.
- Vertical Inspiration Fold Over Cards
- Opaque sticker paper (opaque covers better than the glossy)
- Ordinary scissors or Squishy Scissors
Steps:
- Stamp Aloha on right side of card (it’s actually inside of card) with preferred colors
- Stamp ocean background stamp with periwinkle Blending Blox pad. Best to practice on scratch paper to see preferred effect. Make bottom part of image green with marker. Dee’s style is to apply ink directly to the rubber and then press to paper. With Blending Blox, ink top of stamp first, then turn pad to place dark ink color to dark and light color to light. Then you have blends that flow and are not abrupt.
- Stamp palm tree in darker color like bottle green to show distance. Just stamp top of tree that will actually be seen.
- Stamp statue on opaque sticker paper using shades of brown or shades of gray Blending Blox pad. These pads give variation giving illusion of light and are more interesting than plain solid color.
- Make pineapple yellow and green and flower piece on head pink or mixed colors.
- Cut out statue leaving 1/32” all around for definition.
- Place statue parallel to card’s opening. Card opens 1/3 distance from right side of card. Remove and attach tiny bit of sticky backing to card where wanted. Then remove the rest of backing and smooth to stick permanently with hand.
- Stamp foreground palm tree on opaque sticker paper leaving same 1/32”. Place, remove bit of backing and smooth into place.
- Write or stamp a message inside.
Read NextDIY Tissue Paper Pom Poms

