Neverland Paper Lanterns
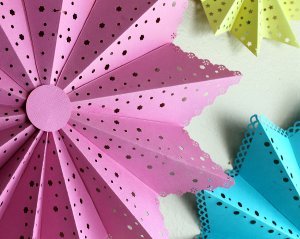
Dazzled with stars and whimsical borders, these Neverland Paper Lanterns from Fiskars are a great addition to any party decoration. A little origami and a little simple paper crafting technique, these paper lanterns are deceptively easy (and fun) to make.

Materials:
- Cardstock
- Adhesive
- String
- Scissors
- Fiskars Punches
Instructions:
-
To make your own star lantern like mine, start by cutting a square from cardstock or paper. My squares measured 6” across for the larger lanterns and 3” for the smaller one. By starting out with bigger or smaller squares, you can make different sized lanterns. I cut 12 squares for my lanterns, though you can experiment with how many points to your star you prefer.

-
Fold your squares in half along the diagonal then bring the two side corners into the middle and fold flat.

-
Open up and trim off the left fold you made, leaving the right fold as a flap to glue each point together.

-
Take two folded points and glue together at the side flap. Select your favorite Fiskars punches and after marking with a ruler where to place the holes, punch the cardstock on the fold in order to get an even pattern on both sides.

-
Work your way around the star joining each new point to the previous one, before punching.

-
Another option is to use border punches along the outside edges and different lever punches along the center. I recommend using border punches on the star points before they have been glued together. The possibilities really are endless and it’s fun to experiment with a few different designs before committing to your favorite.


-
Join the last two points together to complete the star.

- I finished the centers of my lanterns by adhering a small punched shape to the tips of the star.
Read NextDiy Gift Card Envelope

