Paper Duckie
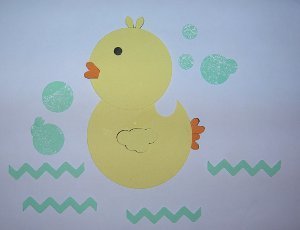
This simple Paper Duckie punch art is great for adding to a scrapbook page or turning into a card for a new little one. In a few simple steps, you can easily turn paper scraps into this cute paper duck!

Materials:
- 2 inch circle punch (body)
- 1 inch oval punch (remove piece from body)
- 1.5 inch circle punch (head)
- 1 inch daisy punch (feathers)
- 1 inch folk heart punch (beak & feet)
- 1 inch cloud punch (wing)
- Regular circle punch (eye)
- Zig-zag chain punch (water)
- Small circle punches: ½, 1, 1.5 & 1¾ inch (bubbles)
- Yellow cardstock
- Orange cardstock
- Light blue cardstock
- Black cardstock
- Glue stick
- Scissors
- White paint
- Small piece of natural sponge
Instructions:
-
To start off with you will need two graduated circle punches. As long as you have a “large” circle punch and another that is about one half an inch smaller you can make a ducky “easy-peasy”. Lots of punches other than the cloud can be used to make the wing; a small heart leaps to mind. A tiny heart can also be used to make the beak and feet. Cute duck feet can also be made from a small flower punch.
-
Sponge paint the blue cardstock with the white paint and sponge to create a lacey effect for the bubbles.
-
Punch all shapes needed. You will also need one additional punch of each shape punched from black to create a 3D effect.
-
Glue black punches on each colored shape.
-
Remove unneeded portions of the punches. Use a small oval punch to remove a piece of the duck’s back. I don’t have one the size I needed so I grabbed my Stampin Up bird punch and used the wing to make the “divot”.
-
Glue punches together.
-
Layout your scrapbook page or homemade card and enjoy!

Read NextStar Wars Valentine's Day Cards

