Circus Daze Birthday Theme
Little boys of all ages will love this fun and colorful Circus Daze Birthday Theme. Complete with lots of decorations and invitation ideas, this party theme would be great for any occasion. Mix and match paper designs to create a look that your child is sure to love!

Materials:
- Therm O Web Mini Runner – Sticky Dot
- Therm O Web Supertape 1/8”
- Therm O Web Supertape ¼”
- Therm O Web Zots – Small
- Therm O Web Zots – Medium
- Therm O Web Glitter Dust – Silver
- Therm O Web iCraft Dots 1.5”
- Therm O Web 3D Adhesive Foam – Squares
- Ruby Rock-It Carnival King Collection: Pattern Paper, Garlands, Die Cuts, Project Cards, Pockets (cards & stickers), Stickers, Party Picks.
- 8×10 craft canvas, chipboard letters, acrylic paint, texture medium, coordinating cardstock (red, white, kraft)
Instructions:
-
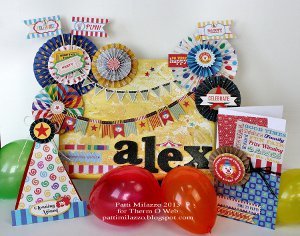
Partially cover canvas with textured medium. Let dry overnight. Apply watered down acrylic paint with foam brush. Use a light hand and no need to cover entire surface. Apply spray ink (splatters) if desired. Again, let this dry thoroughly. Then spray with Therm O Web Silver Glitter Dust and let dry.

-
In the meantime, start creating 8-10 paper rosettes from Ruby Rock-It Carnival King pattern paper. Cut various widths from 1” – 1 ¾” and 12” long. Score at each ¼” mark across the entire length and accordion fold. Attach the ends using strips of Therm O Web Supertape. To flatten and secure the rosette shape, apply iCraft Dots to punched circles and press onto the back of each rosette. Another punched circle can be added to the front as well to ensure that the rosette keeps its shape.

-
Once the rosettes are made and the canvas is dry, adhere the rosettes near the top corners of the canvas using Therm O Web Zots. Layer the rosettes, as shown.

-
Adhere Die Cut paper and fabric strips to the canvas using Therm O Web Supertape.

-
Attach the ends of Garlands to center of rosettes with Therm O Web Zots. On the right side, attach the Garland ends with Zots near the top corner. Add other embellishments (Die Cut Tickets, Party Picks, etc.) using Therm O Web Zots and 3D Adhesive Foam Squares.


-
Embellish the right top corner in the same way – layering rosettes and adding other embellishment accents – using Therm O Web Zots and 3D Adhesive Foam Squares.

-
Sand and paint chipboard letters with black acrylic paint. Let dry and spray with Therm O Web Silver Glitter Dust, then let dry. Use Zots to adhere the letters to the bottom right side of the canvas. Apply “Big Top” sticker above a letter. Also apply small star stickers to canvas, as shown.Tip: Add a quick spray of Glitter Dust to “seal” the tiny star stickers onto the canvas.


-
To create the quick Greeting Card, tuck Die Cut cards behind a pattern paper “pocket” on the lower half of the card. Use the Therm O Web Sticky Dot Mini Runner to adhere the layers to the front of the card. Add a rosette created from kraft cardstock and embellish it with punched and die cut circles. Use the Mini Runner again to apply the Die Cut phrases near the bottom of the card.


-
For the Party Hat Treat Box, create a triangle box from cardstock. Adhere a triangle shape to the front of the box and a 1” x 4” strip at the bottom using the Sticky Dot Mini Runner. Create a small rosette from pattern paper and adhere to the top with Zots. Add the “Clowning Around” Die Cut accent using 3D Adhesive Foam. Punch holes at the narrow end of the box, fill with treats and tie with ribbon or twine.


Read NextDiy Mickey Mouse Cake Plates

