Tropical Terrarium
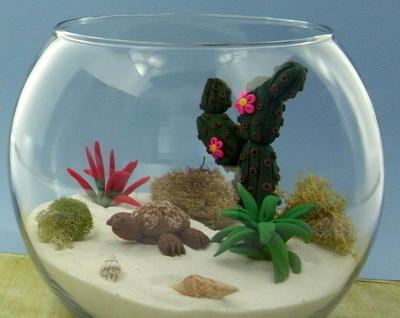
Love the look of a terrarium but worried about the upkeep? With this Tropical Terrarium, you can have a colorful clay decoration that requires zero maintenance! Display it in your living room or bathroom for a fun piece of DIY home decor that's sure to brighten up your living space. This DIY terrarium is also a great gift for someone who is moving into a new apartment or college dorm room. You can make extra clay "plants" and switch up the look of your cute succulent craft every now and then to keep your guests guessing.
For more ideas on what to do with clay, check out these 9 Unique Uses for Polymer Clay.
Materials:
- 1 block Sculpey® III: Black - 2 oz
- 1 block Sculpey® III: Hazelnut - 2 oz
- 1 block Sculpey® III: Beige - 2 oz
- 1 block Sculpey® III: Red Hot Red - 2 oz
- 1 block Sculpey® III: String Bean - 2 oz
- 1 block Sculpey® III: Lemonade - 2 oz
- 1 block Sculpey® III: Leaf Green - 2 oz
- 1 block Sculpey® III: Candy Pink - 2 oz
- Sculpey® Super Slicer Tool Set
- Glass Bowl
- Sand
- Shells
- Dried moss
- Toothpicks
- Sandpaper
Instructions:
Do not use unbaked clay on unprotected furniture or finished surfaces. Start with clean hands and work surface area. Good work surfaces include wax paper, metal baking sheet, or disposable foil. Knead clay until soft and smooth. For best results, clean your hands in between colors. Shape clay, pressing pieces together firmly. Bake on oven-proof glass or metal surface at 275 °F (130 °C) for 15 minutes per 1/4” (6 mm) thickness. For best baking results, use an oven thermometer. DO NOT USE MICROWAVE OVEN. DO NOT EXCEED THE ABOVE TEMPERATURE OR RECOMMENDED BAKING TIME. Wash hands after use. Baking should be completed by an adult.
- Begin by preheating oven to 275 °F (130 °C). Test temperature with oven thermometer for perfectly cured clay. For best results, condition all clay by running it through the clay dedicated pasta machine several passes on the widest setting. Fold the clay in half after each pass and insert the fold side into the rollers first.
- Roll out 2 thin snakes (approx. 1/8” thick) using Red Hot Red and String Bean clay. Using the plastic craft knife, cut each snake into 10 short pieces (approx 5/8” L). Press one Red short snake piece and one Green short snake piece together, then slightly roll in your hand to make the ends pointy. Press all 10 Red/Green pieces together on the Green side, to make the plant.

- Roll out a String Bean snake that is 1/4” thick. Cut into 1” pieces. You will need 15 all together to make the plant. Shape each into slightly flattened pointed long leafs. Press a line into the middle of each using one of the purple modeling tool. Then press them all together to shape the plant.

- Make the following pieces out of Leaf Green clay:
• Base of cactus - one large slightly flattened oval bead (approx. 1.5” L x 3/4" thick).
• Top smaller pieces of cactus - two slightly flattened ovals (approx. 3/4"L x 1/2” thick).
• Side piece of cactus - one slightly flattened oval (approx. 1 1/4"L x 5/8” thick).
• Top larger piece of the cactus - one slightly flattened oval (approx. 1 1/16” L x 3/4" thick).
Using the plastic modeling tool, draw vertical lines into each piece. Take toothpicks and
assemble the cactus as shown.
- Use Hazelnut clay to make small flattened balls that are 1/8” diameter. You will need to make 120 to cover the cactus on both sides. Use the plastic modeling tool to make an indent into the middle of each one while pressing them onto the cactus.
- Take Candy Pink and make five small flattened balls that are 3/8” diameter. Attach them into a flower shape. Make five small flattened balls that are 1/8” diameter. Attach those into a flower shape. Using the purple modeling tool, make petal indents onto each one.
- Using Lemonade, make two small flattened balls approx. 1/8” diameter for the flower centers. Press each into the Candy Pink flowers and attach to the cactus as shown.

- Take 1/4 oz of Hazelnut clay and cut it into six equal pieces. Shape one piece into a pointed club for the head and tail part (approx. 1 5/8” L x 1/4" thick at the thickest end). Use two pieces to make a flattened oval for the top shell (approx. 15/16” L x 3/4" w) Use one piece to make a flattened oval to go on the bottom of the shell (approx. 3/4" W x 13/16” L) Use two pieces to make the four slightly flattened club legs. (approx. 5/8” L x 5/16”thick at the thickest end). Using the plastic knife, cut four toes into the thick end of the club.
- For the spots: Take Hazelnut and Beige and marble them together. Make seven flat balls (approx. 5/16” diameter)
- For the eyes: Make two tiny balls out of Black clay (approx. 1/16” diameter).
- To assemble: Lay the bottom shell piece on your work surface. Center the head/tail piece on top of that (make sure the head is sticking out farther than the tail piece (there should only be a small tail part showing). Attach the four feet and then add the top shell part. Using sand paper ad texture to the top shell and feet. Then add the spots onto the shell and the eyes onto the head.

- Bake according to the directions above. Let your pieces cool completely. Assemble your terrarium with the sand, moss, shells, and your clay pieces. Enjoy!
Check out more garden crafts here: Craft Outside: 84 DIY Garden Ideas.
Read Next4 Barnyard Polymer Clay Ideas
Your Recently Viewed Projects
mulberrygalprinces s
Jun 19, 2018
This is just what I was looking to find. My fianc is a lawyer and he wanted some thing decorative on his desk. Plants were out because of his past experiences with killing them. Statues were too cold looking. Then I saw this. I love working with clay. I can't wait to show him.
asoley 3922608
Jun 27, 2016
What a cool idea! I love clay projects. This is one plant collection that will survive anything!
Report Inappropriate Comment
Are you sure you would like to report this comment? It will be flagged for our moderators to take action.
Thank you for taking the time to improve the content on our site.

