Watermelon Bird Placemat
Use a watermelon motif and cheerful colors to create a set of quilted placemats for a bright and festive table. Follow the diagrams to create these watermelon quilts with bird applique from Design Originals.

Materials:
Fabric Used: “Oh Cherry Oh” by Me & My Sister
- 3 strips OR 41⁄2" x 44" of White (1⁄8 yard)
- 2 strips OR 3" x 44" of Red
- 2 strips OR 3" x 44" of Aqua
- 1 strip OR 11⁄2" x 44" of Green
- 1 strip OR 11⁄2" x 44" of Pink
- Binding Purchase 21⁄2" x 76" (1⁄6 yard)
- Backing Purchase 15" x 22"
- Batting Purchase 15" x 22"
- Applique Purchase 1" Yellow; Aqua included in strips
Cutting Chart:

Instructions:
Refer to the Placemat Assembly diagram.
Use 1 Watermelon block.
BORDERS:
Sew a Pink and Aqua strip together to make a piece 21⁄2" x 181⁄2". Repeat with the other Pink and Aqua strips. Sew a set to the top and bottom of the mat. Press. Sew side strips to the mat. Press.
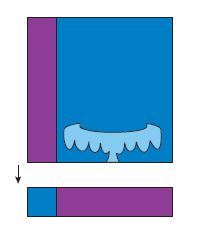
Applique: Use Applique Pattern. For bird, Sew 4 Aqua strips together to make a piece 41⁄2" x 61⁄2". Press. Cut out 1 bird. Fold a 1" Yellow square into a beak shape. Position beak under the bird and applique in place. Embroider the eye with a French Knot.
Quilting: Quilt as desired.
Binding: Cut strips 21⁄2" wide.Sew together end to end to equal 76". Sew Binding to Mat.
Unit 1 Assembly:
Sew a White 18" strip and a Green 18"strip together side by side to make a piece 21⁄2" x 18". Cut the piece into 12 units, each 11⁄2" x 21⁄2". Label the pieces Unit 1.
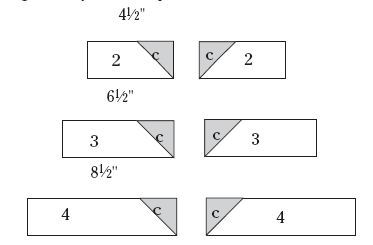
Snowball Corners
Several strips in each block use the Snowball Corner technique. The direction of the diagonal for each strip in the block varies, so you must carefully note the diagonal on the block assembly diagram. Some strips have a corner on only one end. The squares used as Snowball Corners are labelled with a “c” in the cutting list. TIP: Fold back the triangle and check its position before you sew.
STEPS: Align a square with the appropriate end of the strip and sew on the diagonal line. Fold the triangle back and press before attaching it to any other strips.
Sew Snowball Corners to the White Strips:
Line up a Green “c” on one end of White #2. Draw a diagonal line. Sew on the line. Fold the corner back and press. Cut off excess fabric from underneath. Repeat with the second Green “c” and #2, being sure the diagonal is in the opposite direction. Repeat with Green “c” on each White #3 & 4.
Sew Corners to the Red Strips:
Line up a Green “c” on one end of Red #7. Draw a diagonal line. Sew on the line. Fold corner back. Press.
Cut off excess fabric from underneath. Repeat on the other end of Red 7, being sure the diagonal is the opposite direction. Repeat with Green “c” on both ends of Red 8. Repeat with Green “c” on both ends of Red 9.

Row Assembly:
Row 2: Sew Unit 1- Red #6- Unit 1. Press.
Row 3: Sew Unit 1- Red #7- Unit 1. Press.
Row 4: Sew White #2- Green #14- Red #8- Green #15- White #2. Press.
Row 5: Sew White #3- Green #16- Red #9- Green #17- White #3. Press.
Row 6: Sew White #4- Green #10- White #4. Press.
Rows 7, 8 & 9: Sew 3 White strips #11-12-13 together. Press.
Rows 1 & 2: Sew 1 White strip #5 to Row #2. Press. Sew the rows together. Press.
Borders:
Sew a White 91⁄2"strip to each side of the block. Press.
The block will measure 91⁄2" x 181⁄2".
Make 3 Watermelon blocks.
Read NextMini Barn Star Quilt
Your Recently Viewed Projects
jadamen
Jun 05, 2010
The placemats are so cheerful and beautiful! I would love to make a very simple placemat first. Then maybe I could tackle this project. Two people pieced and quilted the one in the photo!
Report Inappropriate Comment
Are you sure you would like to report this comment? It will be flagged for our moderators to take action.
Thank you for taking the time to improve the content on our site.

