Je T'aime Wedding Scrapbook Layout
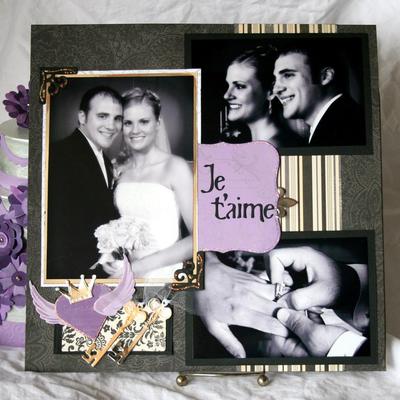
Je t’aime means "I Love You" in French, and this happy couple defines that phrase. Silver and gold keys and a heart in flight, adorned in glitter, make the layout from Spellbinders suitable for framing. A great free wedding scrapbook layout!

Materials:
- Spellbinders Products S3-004 Symbology, S3-107 Decorative Photo Corners, S4-14 Timeless Heritage, S4-136 Classic Heart, S4-142 Large Classic Rectangle, Large, S4-144 Large Classic Rectangle, Small, S4-161 Labels 1, L2-14 Excalibur Font, S4-073 Artist Trading Card
- WordWin Dark Heritage Black; Light, Medium and Dark Lovely Lilac
- Silver Gold Mirri Card papers
- Clearsnap ColorBox Quicksilver Pigment ink
- Wisteria Chalk ink
- Stamps
- coin envelope
- black ink
- glitter glue
- tulle
Steps:
- Start with two 3 1/2" x 5" photos, and one 5" x 7". In image-editing software, convert to black and white, blur slightly and “burn” along the outer edges.
- Mat the small photos on black cardstock.
- With a swirls stamp and silver ink, stamp along the edge of the large white mat, 5 1/2" x 7 1/2". Mat the remaining photo onto 5 1/4" x 7 1/4" Silver Mirri paper, then the white stamped mat, leaving out the adhesive along the right side where the Labels 1 gets hidden away.
- Cut and emboss the following dies:
- Decorative Photo Corners (S3-107) from black cardstock, embellish with Stickles.
- Fleur de lis (Symbology, S3-004) from Silver Mirri.
- Crown and key (Timeless Heritage S4-014 and ATC -retired) from Silver Mirri, embellish with Stickles.
- Key (Timeless Heritage) from Gold Mirri, embellish with Stickles.
- Heart (Classic Hear S4-136) from Dark Lovely Lilac, stamp music notes, embellish with Stickles.
- Wings (ATC-retired) from Light Lovely Lilac, ink through the die with Wisteria Chalk ink.
- Labels 1 (S4-161) with Medium Lovely Lilac, stamp with lines and swirls stamps in Quicksilver ink.
- Classic Rectangle, Large (S4-132) in Medium Lovely Lilac (for journaling). Attach fleur de lis.
- Classic rectangles in pattern paper.
- Title letters, in Excalibur font and black cardstock.
- allow Stickles to dry completely before using on layout.
- Attach a strip of striped paper along the left half of the background paper.
- Attach smaller photos at top and bottom of right side of layout.
- Adhere small coin envelope, (flap is cut off) to the back of the Labels 1 die, then adhere that, tucked under the silver photo mat. The rectangle with fleur de lis slides inside the hidden envelope for hidden journaling. The labels 1 die cut should be about ¼ covered by the photo.
- Attach Decorative photo corners to 5" x 7" photo.
- Arrange and adhere the pattern paper rectangles with the heart and wings and 2 keys under the 5" x 7" photo, slightly overlapping.
Read NextOur Family Scrapbook Layout

