Noel Scrapbook Page
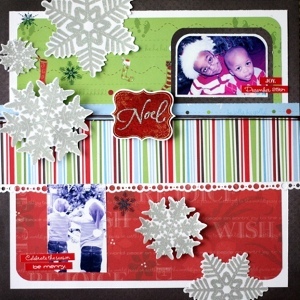
Preserve your Christmas memories in a festive scrapbook page that uses gorgeous Christmas paper. The noel scrapbook page is a great winter scrapbook layout to bring your photos to life.

Materials:
- Studio Basics 101 Patterned Paper (22166, 22182, 22163, 22164)
- Art Warehouse Die Cut Snowflakes (24481)
- Melange Merry & Bright Rub-Ons (21758)
- Studio Basics 101 Sticker Sheet (22186)
- Teri Martin Sticker Sheet (24858)
- Cardstock (2- Brown, 2 White)
- Border Punch, Floss
- Corner Rounder
- Silver Stickles
- Pop Dots
Instructions:
- Use a sheet of brown cardstock as the base of the layout.

- Cut white cardstock to 11” x 11” and adhere to center of brown cardstock.

- Cut green patterned paper to 10 ½” x 3 ¾”. Round top corners and adhere to white cardstock, leaving a 1/8” border around the sides. Cut red patterned paper to 10 ½” x 4. Round the bottom corners and adhere to the bottom of the white cardstock leaving a 1/8” border around the sides.

- Cut a 12” x 2 ½” piece of striped paper, a 12” x ¾” piece of blue patterned paper and a 12” x 1” strip of white cardstock. Punch a border in the white cardstock and adhere to the bottom of the striped paper. Affix blue strip to the top of the striped paper, as shown.

- Affix the piece from step 4 to the layout, approx. 4 ¼” from the top.

- Cut 2nd piece of brown cardstock to a sixe ½” larger than your photo. Round the top corners and adhere to the right side of the layout, as shown. Affix 3 strands of floss to the top of the striped paper. Affix “Noel” sticker to a piece of white cardstock, trim leaving a 1/8” border; adhere just below photo mat. Ahere snowflakes to layout, as shown. Allow a couple to hang over the edge and trim excess, use pop dots, if desired. Affix rub-ons snowflakes.

- Cut a white piece of cardstock to 1/8” larger than your photo; round top corners. Use to mat photo and then affix to brown cardstock mat. Add additional photos, as desired. Add word stickers to photos.
Read NextHoliday Cowboy Boots

