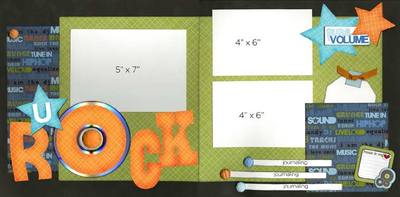
U Rock 2 Page Layout
Turn up the volume with this rock-inspired scrapbook layout from Imaginisce, made with Live Loud papers. An old CD adds the perfect shape and shine to your rock scrapbook layout.

Materials:
- 1 - 12” x 12” Turn It Up paper #002148
- 2 - 12” x 12" Ear Candy (green side) paper #002149
- Text Sheet printed on White Cardstock (attached)
- Rapper Ribbons #002159
- World Tour Rub-ons #002157
- Playlist Sticker Stacker #002155
- i-top Brad Maker Tool #001309
- 4 - Small Brad Daddies #001311
- 1 - Large Brad Daddy #001313
- 2 - Black 12" x 12" Cardstock
- Black chalk ink, Clearsnap
- CD-Rom (new or used)
- Clipart
Instructions:
- Ink edges of all trimmed papers using the black chalk ink.
- Trim Turn It Up paper to 3 1/4" x 9" and adhere to left page approximately 1 1/2" from top edge and 1/2" from left edge.
- Trim Ear Candy (green side) paper 8 1/2" x 10" and adhere to left page.
- Trim all shapes and letters from text sheet that you've printed off onto white cardstock.
- Adhere circle "O" to CD-Rom and adhere CD-Rom and title letters to left page as shown.
- Trim Ear Candy (green side) paper 11" x 10" and adhere to left page as shown. Be sure to line up bottom and top edge with green paper from right page.
- Trim Turn It Up paper to 5" x 5 3/8" and adhere to right page to create "pocket".
- Create journaling tag from 3" x 5" strip of white cardstock. Adhere 1" x 2" strip of light blue paper scrap to top of tag. Tie orange ribbon into knot and adhere to tag as shown.
- Cut out "Flower Patch" title from rub-on sheet and rub-on to layout under photo.
- Write journaling along scrap strips of white cardstock. Using i-top Tool, create four small covered brad daddies and one large brad daddy.
- Mount brad daddies to layout as shown.
- Add sticker stacker to bottom of pocket.
Read NextVintage Wedding Day Scrapbook Layout

