Hooded Shark Towel
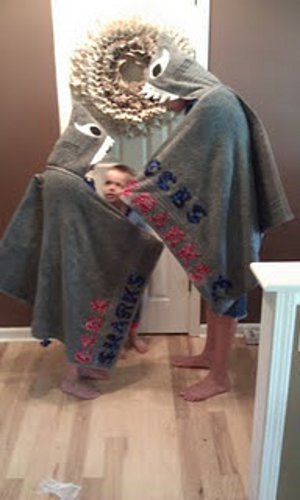
Swimmers beware! This Hooded Shark Towel is sure to be sweeping beaches nationwide! This shark hooded bath towel pattern is easy to follow and fun to wear! Use it after bath time, after a swim meat, or show it off at the beach!

Materials:
- 1 large grey towel
- 2 grey hand towels
- 1 red hand towel
- 1 white wash cloth
- Felt sheets (1 black, 1 white)
- Matching thread
- Scissors
- Sewing machine
- Iron
- Fusible wed
- Fabric
Instructions:
- Find a large clean surface. Towels are pretty big and there will be a lot of flipping towels, ironing towels, cutting towels, sewing towels, etc.

- Fold one gray hand towel in half and cut. Set aside 1 of the halves for a later date when you want to make another hooded towel.

- With your remaining half of a hand towel you need to fold it in half again. RAW edges together and at the top.

- Make a pasiley template for the shark eyes. Place your template on to your white felt and cut 2 eyes.

- Once your eyes have been cut out place them about 2" below the raw edges and maneuver until you like their position. Make sure they are even on both sides.
- PIN and sew using a ZIG-ZAG stitch.


- Now for the PUPIL or black part of the eye. You can free hand an oval/circle template and cut it out using the black felt.

- Pin and sew exactly like the white part, using a zig-zag stitch.


- Keeping all of the same edges together, just turn it right sides together.

- Sew the RAW/cut edges together first using a straight stitch and then a zig-zag stitch. You should now have what looks like a hood with 2 eyes.
- Switch over to black thread for gills. Start your first in proportion with the eyes. Using a 0.7 zig-zag stitch, sew a straight line about a finger lenth or so.
- To make 3, just use your first as a guide. When you finish with the gills on both sides, switch back to your gray thread and a straight stitch.
- Get out your white wash cloth and fold it in half into a triangle shape.
- Draw some sharp and ferocious looking shark teeth on with a Sharpie marker. Do not worry about drawing perfect lines. Once it is all drawn get ready to sew again.


- Using a straight stitch, sew over the lines of teeth that you just made on the washcloth.
- You will have to turn it a lot. Back and forth, back and forth. Back stitch at the points.
- Carefully cut out your teeth, making sure not to snip where you sewed. Once you have that all finished find the center of the teeth and pin it to the center top of the hood opening.

- ZIG-ZAG stitch the pieces together and look at what we have here!

- Now grab that red hand towel and cut it in half just like we did with the gray one.
- Throw the raw cut edges on the sewing machine and straight stitch and ziz-zag just like before.

- DO NOT turn it inside out or anything because we are going to hide the stitching inside of the hood.


- At this point you should have enough half-sized hand towels to make another hooded towel, just need to get another regular bath towel.
- You should have one more gray hand towel. Lay it out and fold it in half to make to right triangles and carefully cut from one corner to the next.
- Sew the pieces together and sew it to the bath towel for a fin.


- Fold you Regular size bath towel in half like a hamburger NOT a hot dog. Separate the raw cut edges of the fin and use a ZIG-ZAG stitch to apply it to the main towel in the center.


- You will have a little tip left over at the top of the towel. Just snip it off because you are getting ready to attach your hood right over it.
- We just used the sandwich method again: Gray HOOD on top, gray BODY in the middle, red HOOD in the inside, and ZIG-ZAGged the pieces together.
Read NextVintage Handmade Handkerchief Doll

