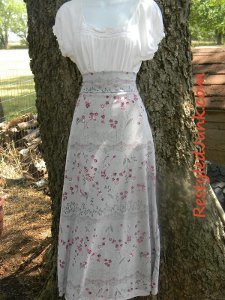
Hippie Chic Maxi Skirt
Show off your groovy side and create your own Hippie Chic Maxi Skirt. Easy skirt patterns are great for beginning sewers and this project will help you expand your skills. You can even create a fitted waistband for a more flattering fit and cool look.

Materials:
- Measuring tape
- Wrapping paper or newspaper
- Pencil
- Yardstick
- Scissors
- 1-1/2 yards knit fabric-45 inches wide
- Straight pins
- Sewing machine
Instructions:
-
Measure your waist. Add 2 inches and divide the total by 2. Note: Your true-waist is often not the waist where you wear clothing with a waistband. I tend to wear waistbands lower than my true-waist. When measuring your "waist", measure where you actually want the skirt waistband to be.

-
Trace a rectangle on wrapping paper or newspaper that is the waistband measurement by 12 inches. Cut out the rectangle. This is your waistband pattern.
-
Measure from your waist measurement to the floor. Add 2 inches.
-
Trace your skirt pattern on wrapping paper or newspaper. The top of the skirt is the waistband measurement, the bottom is 36 inches wide and the length of the skirt is the waist to floor measurement. Note: The pattern will resemble a triangle with the tip cut off. Cut out the pattern.
-
Lay the both patterns on stretchy, knit fabric. Position the length of the skirt pattern and the 12-inch sides of the waistband pattern to run with the grain of the fabric. Pin the patterns to the fabric and cut out. You need to cut two skirt pieces and two waistbands.

-
Place the two skirt pieces together with the right sides facing each other. Pin the sides. Sew the pinned sides using a 1/4-inch seam allowance.
-
Place the two waistbands together with the right sides facing each other. Pin the 12-inch sides. Sew the pinned sides using a zigzag stitch and a 1/4-inch seam allowance. The waistband is now a ring.

-
Open the waistband into the ring shape. Fold the ring in half from one cut edge to the other with the wrong sides facing each other. Turn the skirt right side out. Place the folded ring over the top of the skirt
with the raw edges of the waistband at the top. Pin the raw edges of the waistband to the waistband of the skirt. Sew the pinned edge using a zigzag stitch and a 1/4-inch seam allowance.
-
Fold the waistband up. The construction of the maxi skirt is now finished.
- Put the skirt on. Fold half of the waistband down. With the help of a friend place a pin on the bottom of the skirt at the desired length. Remove the skirt and lay it flat. Cut the skirt at the pinned length measurement. No hemming is required. If a hem is desired, cut the skirt longer to accommodate folding and stitching the hem.
Your Recently Viewed Projects
Linda
Feb 11, 2017
Sewing this skirt in maxi or midi length is how I plan to make this skirt that reminds me of western wear.
Weberme
Aug 03, 2016
Simple way to make a skirt that you know will fit because it is made by your measurements. Nice tutorial except I wish it was more clearer about how to do the waistband. Would be a little hard to understand if you never sewed before and did not know to look on the pattern she made of the length being 12". I love that you can even make one for a child too by using this measuring technique. Great to use this instead of buying patterns and having to cut all the sizes out. When I make a waist I usually decide how wide I want it for length and double it to turn over and measure the width of skirt on top and cut. If you do this before you sew anything up and use same seam width you will not have to add any more.
paver2
Jun 28, 2017
Thank you for the explanation! I am not good at sewing and things like this sometimes bewilder me. I Love the skirt, though, and would like to make one.
Report Inappropriate Comment
Are you sure you would like to report this comment? It will be flagged for our moderators to take action.
Thank you for taking the time to improve the content on our site.

