Messenger Bag For Mom
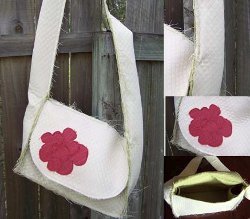
This messenger bag for mom by Caroline Critchfield is a free easy sewing pattern. If you're looking for patterns to sew purses, this is a great one to use, as the bag is large enough to hold all of mom's things!

Materials:
- 1 yard of 58-60 inch home décor fabric
- 5-inch x 12-inch scrap of fabric for the flower appliqué
- (Look for two-sided home decor fabric if you want the inside of the bag to be a different color.)
- 58-inch (1 2/3 yards) of heavy duty fusible bonding (wonder under) for the body of the bag and a little bit more for the flower appliqué. It should be 17 wide
- The optional flower appliqué pattern can be downloaded here: Pattern
Notes:
- All of the seams have been moved to the outside to make decorative frayed edges and to eliminate the need to sew a separate lining.
Instructions:
Step 1. Prepare your fabric:
1. Cut your yard of fabric into two pieces, each 18-inch x 58-inch. Use the entire piece of fusible bonding (uncut) to fuse your fabric pieces together: First apply the fusible bonding to the wrong side of one piece of fabric. Then trim off the un-bonded edges before removing the paper. Fuse this large rectangle to your other piece of fabric (wrong sides together, unless you are working with two-sided fabric). You now have a large piece of double sided fabric.
Work slowly to ensure that the whole piece is bonded.
Apply more fusible bonding to the wrong side of your scrap fabric for the flower appliqué.
2. Mark your fabric and cut out the following pieces:
one 5-inch x 56-inch (strap)
two 8-inch x 12-inch (front and back)
two 6-inch x 5inch (pockets)
one 5-inch x 12-inch (bottom)
one 8 ½-inch x 11 ½-inch (flap)
Flower appliqué pieces for the flap (optional)


3. Use a small plate or bowl to draw curved edges on one end of the flap. Cut along the curved edges.
Instructions for optional flower applique:
Fuse the flower petals to the front of the flap on one side, starting with the largest and stitching around each petal piece before applying the next.

Step 2. Edge-stitching:
Certain edges will need to be stitched ¼ inch from the edge since they won’t be included in a seam.
1. Stitch all around the curved part of the flap.
2. Stitch across the top of your 8-inch x 12-inch front piece.
3. Stitch across the top of both 6-inch x 5-inch pocket pieces.
Step 3. Assembling the bag:
1. Pin the flap to the middle of the front piece, wrong sides together. The front piece should be ¼ inch larger on either side. Stitch across the top with a ¼-inch seam.

2. Pin the lower edge of the front piece to the bottom piece along the long edge, wrong sides together. Stitch a ¼-inch seam that begins and ends ¼ inch from each corner.

3. Pin the back piece to the other long edge of the bottom piece, wrong sides together. Stitch, again starting and ending ¼ inch from each corner.

4. Pin and baste the pocket pieces to each end of the strap piece, wrong sides together.
![]()
5. Pin one short edge of the strap to the bag bottom, with the pocket in the middle, next to the wrong side of the bag bottom. Stitch, beginning and ending ¼ inch from each corner.

5a. Pin the strap to the front of the bag and stitch, beginning ¼ inch from the bottom corner and ending one inch past the top of the bag.

6. Pin the strap to the back of the bag and stitch, again beginning ¼inch from the bottom corner and ending one inch past the top of the bag. Be careful not to catch the flap in your stitching.
7. Repeat steps 3.5 and 3.6 for the other side of the bag.

8. Fold the strap in half the long way and pin the edges together (with the outside of the strap showing). Stitch around the strap, starting and stopping 1 inch past the bag front and back where your previous stitching ended.

Done!
Read NextUmbrella Recovery Project

