Custom Notebooks
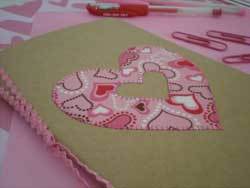
This sweet guest project comes to us from Lisa of A Spoonful of Sugar. Customise a plain notebook with a fabric monogram or image – getting organised has never been so stylish!

Materials:
- Plain cahier style notebook such as Moleskine cahier
- Small pieces of fabric
- Appliqué film such as Vliesofix or Wonder Under
- Matching cotton thread

Choose a monogram or heart to place on the front of your notebook. If using a monogram, use your computer to select the font of your choice. Enlarge it so it is the right size to fit your notebook, and print in out. If using a heart or other simple design, draw it up on a piece of paper. Cut out your image or letter.

Place your image right side down on the paper backing of your appliqué film. Trace around the image on the appliqué film and cut it out leaving a margin of approx 1 cm or ½ inch around it.
Iron the appliqué film onto the wrong side of your fabric, and then cut the fabric letter or image out.

Peel off the paper backing on the image. Press the image onto the front of your notebook using a warm iron. Only iron for a few seconds until the fabric has adhered. Too much heat will cause the notebook cover to warp.

Using a buttonhole stitch or zigzag stitch, sew around the outline of the shape using your sewing machine.

Tie some raffia or ribbon around the spine to finish it off.

Teamed with some cute stationery, these notebooks make a great gift for a teen.

Read NextFloppy Disk Desk Organizer
Your Recently Viewed Projects
jennia
Jun 05, 2010
Absolutely adorable!!! I make a similar project but start with Composition Books- the kind you can pick up cheaply when it is "Back To School" Time. Jennia http://upcycledcrafts.com
Report Inappropriate Comment
Are you sure you would like to report this comment? It will be flagged for our moderators to take action.
Thank you for taking the time to improve the content on our site.

