Seasonal Burlap Bunting
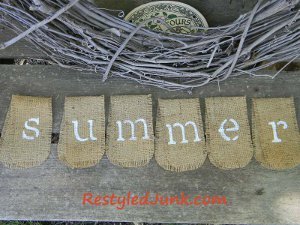
Add a touch of fun and excitement to your space by creating your own Seasonal Burlap Bunting. Use burlap scraps, paint, stencils and more to create a unique look and design. Give your space a facelift for cheap with easy home decor crafts.

Materials:
- 1/3 yard burlap
- Measuring tape
- Scissors
- Iron
- 2-inch letter stencils
- White acrylic paint
- Stencil brush
- Twine
- Straight pins
- Sewing machine
- Silk daisy blossoms
- Craft glue
- Six white buttons
Instructions:
-
Cut a 3-inch-wide by 11-inch-long rectangles from card stock. Round the corners of the rectangle. Trace the rectangle onto burlap with the edges even with the woven threads of the burlap fabric. Trace a total of six rectangles and cut out.

-
Remove the threads around the edges of the burlap rectangles leaving a 1/2-inch fringe.

-
Fold one rectangle in half with the short ends matching. Shift the top layer 1 inch to the right. Press the folded burlap to crease the fold. Repeat on the remaining burlap rectangles.

-
Choose which side of the folded rectangles will be the front. Center and stencil one letter from the word "summer" to each burlap rectangle using 2-inch letter stencils and white acrylic paint. Allow the paint to dry.
-
Cut a 45-inch length of twine. Fold the twine in half. Place a straight pin on the fold. Unfold and stretch the twine across your work surface.

-
Slip the painted rectangles over the twine to spell out "summer". Position an "m" on each side of the straight pin. Separate each burlap rectangle by 2 inches. Pin the burlap to the twine. Sew a zigzag stitch along the folded edges and over the twine sandwiched in between the layers.
-
Pull a 2 1/2-inch silk daisy blossom off of its floral stem. Peel away the plastic on the bottom of the blossom and pull out the center from the top. Separate the daisy layers. My daisies had two petal layers. I needed six layers, so I used three daisies.
- Glue a daisy petal to the top-center of each burlap rectangle using craft glue. Apply a dot of craft glue to the center of each petal. Place a white button on each dot of glue. Allow the glue to dry.
Read Next47 Summer Crafts for Adults

