How to Paper Bunt Perfectly
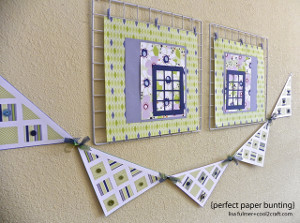
From these craft instructions from Lisa Fulmer, you can learn How to Paper Bunt Perfectly. No need to buy garlands or decorations because you don't feel that your technique is up to snuff. These how-to craft instructions will teach you tips and tricks on achieving that perfect triangle shape for paper bunting. If you want to pursue paper craft ideas and projects in the future, this paper bunting tutorial will be well worth your while. Brush up on a valuable crafting skill by checking out this tutorial today.

Materials:
- KellyCraft Get-It-Straight Laser Square
- White cardstock - cut to 8.5" square
- Scrapbook papers in coordinating patterns/colors
- 1.5" square punch and small hole punch
- Paint markers
- Scissors
- Dry adhesive and craft glue
- Ribbons and buttons
Instructions:
-
Cut each square of cardstock in half on the diagonal to make desired number of flags.
-
Position flag inside laser square (hold in place with a bit of tape if needed).
-
Move laser pointer to shine a line approximately 3/8" inside the edge of one side of flag.
-
Punch several squares from each scrapbook paper; cut a few into triangles.
-
Move the laser pointer as needed to position squares and triangles on the flag as desired, approximately 3/8" apart, alternating patterns/colors.
-
Apply dry adhesive to each square and triangle, then press back into position, using the laser pointer as a guideline.
-
Glue buttons on the squares to accent.
- Punch a small hole in the corner of each flag, then thread ribbon through to tie the flags together with little bows.

