Reverse Painting Technique on Glass
Are you interested in reverse painting crafts? Not even sure what that means? Try the Reverse Painting Technique on Glass from Tiffany Windsor. This is a fun way to transform boring glass items such as vases and frames. Unlock a world of crafty possibilities.

Materials:
- Frame with glass
- Pattern
- Tulip Slick 3D Paint (I used white)
- Acrylic paint (colors of your choice)
- Paintbrushes
- Palette (can use paper plate or waxed paper to hold and mix paint)
- Scrapbook paper (or acrylic paint) for background
- Craft knife (optional)
- Wet wipes
Instructions:
- The first step in this project is to select your pattern. There are many on-line sources along with pattern books and coloring books that work great for this technique. I prefer to use stained glass patterns for this technique. You can also take a photograph and outline the florals (or any subject matter) to create your own pattern.

- Place your pattern underneath your glass. I used Tulip Slick 3D Fashion Paint for this project. You can outline your design in any color. I chose white because I wanted a finished project that had a vintage retro vibe.

- When using the Tulip Slick Paint, the first thing you want to do before you remove the cap is to tap the tip into the palm of your hand. This helps to move the paint into the nozzle and it helps to remove any air bubbles. When you get air bubbles in the paint, it tends to “spit and spatter” so this step helps to remove bubbles.

- Holding the tip of the paint bottle to the glass, trace your pattern. Be sure that all intersecting lines connect. This will help to keep the acrylic paint within your pattern lines. Let your paint dry overnight.

- Sometimes when I am tracing my patterns, the tip of the bottle leaves a slight “ghost” image of paint on the glass. I just use the tip of a craft knife to clean up any excess paint that has dried where I don’t want it on the glass.

- I used 4 different colors of acrylic paint and mixed them together to create varying shades of colors. Be sure to mix enough paint to apply 2 coats. Paint inside your pattern lines applying paint colors where desired.

- I like to turn over my glass to look at the front side to be sure that I have painted all the way up to the lines.

- Continue to paint with all the colors. Don’t worry if your paint covers some of the white lines because this is the back of your artwork.

- Paint all areas with one coat, let dry completely and add second coat. This is still a view of the back of your artwork. It doesn’t look like much on this side…but when you turn it over…

- …pretty! Double check to be sure that you have painted all the way up to the white pattern lines! When you turn over to look at the front, you will be able to see if you missed any areas. Let dry completely.

- After your paint has dried, you can paint the entire back of your artwork with acrylic paint, or you can use scrapbook papers to complement your painted design.

- This is a pretty paper with script writing that looks pretty with my florals.

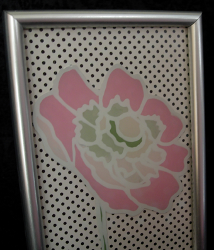
- I picked the black polka dots paper for my finished design! Cut the paper to size and place glass and background paper back into the frame.

For a comprehensive video tutorial of this project, check out How to Reverse Paint on Glass.
Read NextBest Ballpoint Pens for Drawing

