Turkey Wobbler
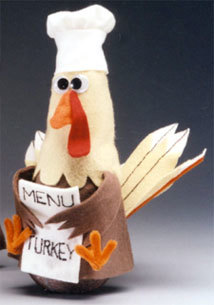
If you're looking for Thanksgiving crafts to make, consider creating this Turkey Wobbler. With some felt and wiggly eyes, you can make this adorable turkey. Have him sit in the middle of the table during Thanksgiving or bring it as a little hostess gift. DIY Thanksgiving crafts are a fun and inexpensive way to celebrate the day. The more fun details you add, the more your Thanksgiving craft ideas come to life, so be sure to go all out. You can also personalize your project so it is truly one-of-a-kind. No matter how to decorate it, you're sure to appreciate the cute and fun look.

Materials:
- STYROFOAM* Brand Foam:
- 12" X 4" cone
- 4" ball
- 14 Orange chenille stems
- Two 1/2"-3/4" wiggle eyes
- Clear glass marbles
- Felt, 9" x 12" sheets: brown, flesh, two each; white, orange, red, one each
- Fine-gauge spool wire
- Paints: black dimensional fabric; brown acrylic (optional)
- Scissors
- Ruler
- Pencil
- Fine-line black permanent marker
- Compass
- Candle stub or paraffin
- Wire cutters
- Needlenose pliers
- Awl or ice pick
- Medium flat paintbrush
- Disposable palette
- Metal tablespoon
- Extra-long straight pins
- Large-eye sewing needle
- Serrated knife
- Paper towels
- Thick, white craft glue
- Low temperature glue gun and glue sticks
- Pattern
Instructions:
- Press opposite sides of foam ball on a hard surface to flatten slightly. Wax serrated knife with candle stub or paraffin and cut ball in half.
- Refer to diagram to cut top 4" from foam cone. Mark a line around cone 5" from base. Indent cone on line by pressing foam onto square edge of a counter or table. Note: This will become turkey's neck.
- Refer to diagram to hollow out lower 5" of cone and one half ball by scooping out foam with a tablespoon. Leave approx. 1/4"-1/2" outer shell intact, working carefully to avoid cracking foam. If desired, paint bottom 1" of cone and half ball brown to match robe.
- Place a chenille stem over beak pattern and shape, following outline. Trim the excess stem and then glue shape to orange felt. Let dry and then cut felt beak around chenille stem outline.
- Cut two chenille stems in half. Using patterns, cut one wattle from red felt and two wings from brown felt. Glue wattle and two wings to matching felt, sandwiching a chenille stem between layers. Let dry and then cut wattle and wings from doubled felt, cutting around original shapes. Trim chenille stem flush with wattle but do not trim stems at base of wings.
- Cut out remaining turkey patterns as indicated. Also cut two 2-3/4" X 4-1/4" menus and one 8" X 2" hat bottom from white felt.
- Glue a white tip to top of each flesh tail feather, overlapping pieces approximately 1/8". Glue a chenille stem vertically to center back of each assembled feather, letting it extend 1" at bottom. Layer and glue felt menus together. With black dimensional paint, draw a vertical line down center front of each feather and lettering on menu (see photo). Allow to dry.
- Following patterns, overlap corresponding edges of head and robe pieces 1/4" and glue to form tubes. Turn. Gather felt at top of head 1/4" from edge. To gather felt throughout, use a large-eye needle with fine-gauge wire and hand sew gathering stitches where indicated. Gather felt on wire and then twist wires together to secure. Trim excess wire.
- Place robe on cone with top of felt 1/4" above indented neck. Gather robe around neck. Place head on cone, positioning robe seams at sides and head seam at center back. Spot glue head to body.
- Fold beak in half diagonally with chenille stem to inside. Glue layers together and then glue base of beak to center front of head (see photo). Glue narrow end of wattle to base of beak and then shape. Glue wiggle eyes side by side above beak.
- Refer to diagram to shape a chenille stem, forming a forked foot with attached leg. Trim stem as necessary. Bend leg perpendicular to foot and then wrap bottom portion with a separate chenille stem. Leave approximately 1/2" at top of leg unwrapped. Repeat to make a second foot/leg.
- Use an awl or ice pick to form tiny holes in sides of robe near top and bottom to attach wings and feet/legs. Glue chenille stems extending from wings into armholes and feet/legs into remaining holes. Bend wings forward and then glue menu between them with lettering facing front.
- Overlap and glue short ends of hat bottom to form a tube and then turn. Glue hat bottom to head just above eyes with seam at center back. Hand sew gathering stitches around hat crown 1/4" from edges. Pull threads to gather stitches and form a fabric yo yo, knotting ends to secure. Glue yo yo, gathered side down, centered on hat bottom to form chef's hat.
- Insert and glue feathers in foam body at lower back of robe. Shape feathers, letting them fan out toward sides.
- Turn cone body on end and weight hollow area with glass marbles. Align hollow half ball on bottom of cone with flat sides together and pin in place temporarily. Test turkey's rocking motion, adding or subtracting marbles as necessary. When satisfied, remove pins and glue ball to cone permanently.
Your Recently Viewed Projects
Weberme
Nov 02, 2018
Is this not the cutest turkey you have seen and imagine this on your Thanksgiving table for that holiday tie. This will certainly be the talk of the day. A great craft to do with the kids so they can be part of it. Let them gather thigs to give it their own look or you can do it all yourself. Put a special saying on the card the turkey is holding. Nice tutorial and great idea.
Marilyn B
Nov 03, 2017
Isn't this the cutest little guy? Great detailed instructions too! I could see this being a fun family project for each to make their own! Or make several for each place setting and let the guests take theirs home for a momento of the lovely gathering! This would also,be a nice project for a scout troop or church group to complete, or even as a seasonal fundraiser for a church or school! Cute idea!
Report Inappropriate Comment
Are you sure you would like to report this comment? It will be flagged for our moderators to take action.
Thank you for taking the time to improve the content on our site.

