Bread Dough Jewelry Box
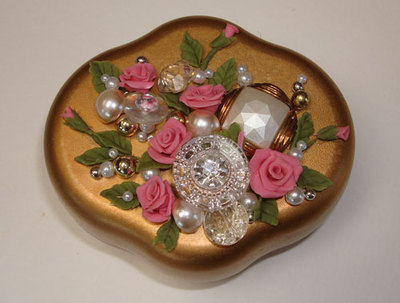
Inspiration can come from just about anywhere! Let Heidi Borchers of Inspired at Home show you how white bread and glue can become a dough for molding beautiful roses. Use those roses to adorn a jewelry box or for other crafts.

Materials:
- Aleene’s® Original Tacky Glue™
- Slice of white bread – crust removed
- Small disposable cup (for mixing bread dough)
- Zip top bag
- Craft stick
- Acrylic paint: flower pink, leaf green
- Embellishments: vintage buttons, craft pearls, beads
- Decorative box
Instructions:
-
Tear bread into cup. Add 1 tablespoon Aleene’s® Original Tacky Glue™. Mix with craft stick until a coarse ball begins to form. Transfer mixture to your hands and roll until ball of dough forms. This step might be messy for the first few minutes but as you continue to roll in your hands, the stickiness will diminish and the dough will form. Continue rolling for several more minutes until smooth.
-
Separate dough into several balls and place into zip bag. To color dough, remove one ball at a time, resealing bag to keep remaining dough moist. Add one drop of acrylic paint at a time and knead color into dough. Continue to add color one drop at a time until desired color is achieved. Return dough to plastic bag. Repeat to color remaining dough.
-
To make roses and leaves, follow how-to instructions.
- Glue roses, leaves and embellishments onto top of box.
How to make roses:
-
Pinch off a pea-sized bit of dough. Squeeze the pea between your fingers to flatten it into a small, round piece the thickness of a piece of paper. To make the center of the rose, roll the flattened piece between your fingers, turning the top edge back slightly to look as if the rose were just beginning to unfurl.
-
Pinch off another pea-sized bit of dough and flatten it as before. Press the top edges back slightly to make a petal. Place the rose center in the center of this petal and wrap the petal around the center, gently pressing them together at the bottom.
-
Make another petal in the same manner. Place this petal opposite the first petal. If possible, look at a real rose while making your bread dough rose. Remember, not all rose petals are the same size. Place subsequent petals a bit higher on the rose, so that the turned back edges are even with the rose center.
-
Add 8 more petals in the same manner, overlapping the edges slightly, to complete the rose. Let the flower air-dry overnight. To glue the rose to a flat surface, cut off the bottom of the rose before it dries completely.
- To make leaf, you will need a small ball of green dough. Pinch off a pea-sized piece and mold it into a teardrop shape. Flatten the teardrop so that it is a bit thicker than a piece of paper. Using a straight pin, make indentations in the top of the leaf for veins. Curl the leaf as desired and let dry. If desired, press leaves in place at bottom of the rose before it dries.
Read NextAmerican Girl Doll Table DIY
nonanunzi
Sep 11, 2010
Thank you Bronxlady. I would love a copy of the original recipe of the bread dough roses and the 4 - 5 different pamphlets. Nona. My email address is adelork001@rochester.rr.com Thank you so much in advance. P.S. I just happened across this page so forgive me for being so late on this. I appreciate your help. Nona again.
sewingsue526 15287 75
Apr 20, 2014
I made theses roses several years ago (30-40 years) . I LOST MY DIRECTIONS and have looked for quite some time. Thank you so very much. It will be a great relief to be able to make jewelry again. Sue
Angelaandjoey
Jul 09, 2010
rated on July 9, 2010 by angela this bread dough recipe is quite different than the recipe i made mine was much easier and required less ingredients and came out wonderfully...I used i to 2 pieces of white bread then I put 3 to 4 drops of acrylic paint to 2 to 4 drops of Aleens glue and rolled it into a small ball..flattened the ball out and squeezed the do'ugh between my fingers and flattened the bread to form a peddle and continued around the small ball until all the peddles were formed...put the roses on the side and let air dry..use a hand powder on hands when rolling the dough so dough does not stick to hands..good luck..
kruepsgirl
May 20, 2010
Please send me the original reciepe and the pamphlets to kruepsgirl@yahoo.com Thanks a bunch!!
nibbler
May 18, 2010
i would like the original recipe for bread dough was it also called salt dough art?
Crafter 18002
May 18, 2010
to Bronxladyj, I would love to have the original recipe for the bread dough roses when you have the time . Please send it to my email: plaplante1@yahoo.com Thanks in advance for your help with this.
unwrittenmelodyyah oocom
May 18, 2010
I'd love a copy of the glycerin recipie if you have a minute. :)Very fun thanks for sharing! :) unwrittenmelody@yahoo.com. Thanks!
Thora
May 06, 2010
bronxladyj, Hi I copied down your recipe for the bread flowers but would also like copies of the 4 or 5 different pamphlets you mentioned. Thanks from Snohomish, Washington
Crafter 3047872
Apr 16, 2010
april 15 2010 i am trying to make small ribbons for a cancer walk to give to all of my survivors. i would love to learn how to do it in the bread and glue. making them to look like porcelin. could you help me on this, please thank you carol
Maine girl
Apr 14, 2010
Hi Bronxladyj, I would love the original recipe for this. Please email to debraandrews99@gmail.com when you get a chance. Thanks for the great project ideas and recipe, and for taking the time to email everyone that has responded.
kasavv
Apr 12, 2010
hi bronxlady, im new to the site but loved your recipe. could you please send me the original thx. my email is nimsi04@yahoo.com. thx again
Chestnuttb
Apr 12, 2010
Hi bronxladyj, I would love the original recipe. Could you please e-mail it to me at Chestnuttb@yahoo.com. Thank you. Chestnuttb
GrannyDarDar
Apr 12, 2010
My email address is celueders@yahoo.com. I appreciate your help with this...
Bronxladyj
Apr 11, 2010
TO ALL THE CRAFTERS WHO WANT THE ORIGINAL RECIPE FOR THE BREAD DOUGH ROSES. HERE IT IS. IF YOU WANT A COPY OF THE RECIPE AND 4 or 5 DIFFERENT PAMPLETS, LEAVE YOUR EMAIL ADDRESS I WILL EMAIL THEM TO YOU OR CONTACT ME BELOW. THIS RECIPE MAKES THE ROSES LOOK LIKE PORCELIN 4 TBS ALEENS GLUE 4 SLICES WHITE BREAD 1 Tsp. COLD CREAM 2 Tsp. LEMON JUICE 4 TBS. CORN STARCH DECOART AMERICANA PAINT ANY ACRYLIC PAINT SHOULD DO ADD PAINT TO GLUE FIRST THEN CONTINUE FROM THERE SHOWER to SHOWER BATH POWDERSPRINKLE SHOWER TO SHOWER ON HANDS AND ON BALL SO THE DOUGH IS NOT STICKY, ADD AS NEEDED YOU CAN CONTACT ME AT Ilovemycats72@yahoo.com
GrannyDarDar
Apr 11, 2010
Please send me the original instructions for this. I help with alot of weddings. This would make a beautiful bouquet for throwing. Also will it cause bugs and if so what can use in place of.
Crafter 21392
Apr 11, 2010
bronxladyj I would like the original recipe for this, please. My e-mail is oochiebelle@aol.com.
Smiley52
Apr 11, 2010
I also would like the originaly receipe for the bread dough flowers. I could use them for favors for a bridal shower but do not want people to have bugs in their homes after awhile. I would like them safe. If anyone has the original one with glycerine I would appreciaate it. Thanks in advance.
pkd718
Apr 11, 2010
When Aleenes had a weekly show many years ago I learned to make these. I still have cassets from their shows which I watch every so often when I need an idea. I've used bread roses so many times and they last for years. Wish their show was still on the air, I miss it.
michela65
Apr 11, 2010
Thanks for this craft idea Bronxlady. If you don't mind, I would also like the original recipe. My email is miltongurl@mchsi.com! Thanks so much!
purplelady10usyaho ocom
Apr 11, 2010
Bronxladyj, I also would like to have the origianl recipe, same name at Yahoo. Thank you in advance. Have a great day and Happy Crafting!!! Don't ya'll just love this site!
De
Apr 10, 2010
I love making these flowers. I have discovered that it is easier to color the dough by putting the paint in the glue if the whole ball is to be the same color. It also works better to use the cheapest white bread. Hints Put the glue and the bread in a zip lock bag to knead it. Use baby wipes to remove the paint from your hands after you start to make it into a ball.
Rheabop
Apr 10, 2010
I made these many years ago - you can make other flowers besides roses if you wish, just shape the dough the proper way. I glued them to barretts, the pin backings you can purchase in craft stores, then wear them as jewelry, or even make very small ones to make dangling earrings. There are so many things and ways to use this idea.
Crafter 19522
Apr 10, 2010
Hi Bronxlady, I would love t he original recipe for this please. How do I get in touch with you to get this ? or can I leave an email address here ? ( I am new so not familiar with the rules around this ) Hope to hear back and thanks . Signet
Bronxladyj
Apr 10, 2010
The original (and best recipe) has glycerine, paint and "Shower to Shower" bath powder in it. The "Shower to shower" gives it a little dazzle. I have the original recipe if anyone wants it.
luvcrafting
Apr 10, 2010
Made the roses as a craft when my 6 year old Granddaughter was here...what fun! Love making memories with her.
GinaJ
Apr 10, 2010
I put the roses on a watering can, left it in the garage, and before I knew it, the roses were gone. I assume a critter got in and had lunch. It also attracted aunts, which is why I put it in the garage to begin with. After that, I completed saturated the roses in a sealer, and there's been no more problems.
cullyann
Apr 10, 2010
I think they sometimes use glycerine to make it smoother. But with the paint, you probably don't have to.
PaulaF
Apr 01, 2010
To crafter 4960740 You should be able to print the directions. Go file and print preview on your browser. Have a look at the pages you want and then click print. Click on page and fill in the range for the pages you want. I print the directions for desired projects all the time.
ReanaZ in PLGA 300 72
Apr 01, 2010
I used this as a child in the 50's at VBS your designs are only limited by your imagination. The new paints allow beautiful crosses and animals as well. (We used Elmers school glue. not quite as good but still worked.)
Crafter 4960740
Apr 01, 2010
why can't I print the directions on the projects? I don't have time to write them all down.Faye
gbethpowers
Apr 01, 2010
I used to make these roses with my grandmother when I was little. About 40 years ago. LOL Loved it and they last a long time, still have a few of the roses.
Neha
Jan 10, 2010
Hey I have a question i have heard of this art before and i remember that they put some chemical in the dough so that it does not catch insects later....as bread tends to catch insects....do you know what it is....
Crafter 8531987
Nov 27, 2009
Something is missing. What do I do after coloring the dough? Ok - shape it and then what? Does it have to be baked, dried? What???
Report Inappropriate Comment
Are you sure you would like to report this comment? It will be flagged for our moderators to take action.
Thank you for taking the time to improve the content on our site.

