Decorative Prayer Boxes
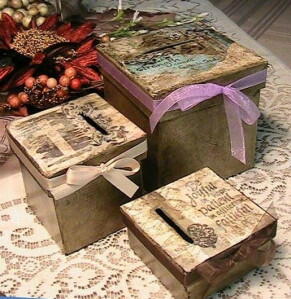
These decorative prayers boxes serve two purposes: first, they are the perfect place to store your prayers and second, they make for beautiful pieces of art. Create these lovely prayer boxes yourself by following these steps.

Materials:
- Paper Mache boxes in various sizes (the largest was 4”x4”x4”)
- Krylon I17011A00 ACE Metallic Antique Gold 11OZ spray paint
- Tree House Studio spray adhesive
- Plaid Classic Mod Podge Matte
- FolkArt ® Finishes Antiquing Polish, Brown, 2 oz., #590
- Decorative paper and tissue in assorted and complimentary colors
- Black square felt pieces (cut just slightly smaller than box dimensions; one per box)
- Various Stampabilities rubber stamps (Christian verses, cross, berry vine)
- CraftSmart Acid Free/Sans Acid Dye-Based black rubber stamp ink
- ½” wide organza ribbons in complimentary colors
- Retractable utility knife
- Small paint brush
- Fabric scissors
- Craft glue
- Soft disposable cloth (used terrycloth towel or cotton t-shirt)
Instructions:
- Sprayed boxes and lids with antique gold paint (let dry thoroughly).
- Glued felt squares to bottom of boxes (cut just slightly smaller than box dimensions).
- Used retractable utility knife to cut ¼” wide and 2¼” long slit into prayer box tops.
- Glued box bottoms and matching lids together (let dry thoroughly).
- Used Mod Podge to glue layered torn decorative papers and tissues to top of box lids. (Here’s where you’re creative design and style should take over. Let dry thoroughly in between coats).
- Used rubber ink to stamp scripture verses and designs onto box lids. (Again, this is entirely at your discretion).
- Applied adhesive craft spray over stamped images to keep ink from running when next coat of decoupage was applied.
- Applied one thin coat of decoupage to seal designs (let dry thoroughly).
- Used soft cloth to “sponge” brown stain on box lids and sides to give it that worn and antiqued look (use stain sparingly over design).
- Applied final coat of decoupage on box tops and sides to seal stain (let dry thoroughly).
- Tied colored ribbon around box lids and secured with glue.
Your Recently Viewed Projects
mrstlsweet 4495171
Jul 02, 2022
I am unable to find a 4 x 4 paper mache box. I've searched everywhere including Hobby Lobby and an extensive google search. Where did you get that size?
sunnymcnair22
Nov 21, 2010
What a great idea! I did change one element, though -- I did not glue the top and bottom together as I've found that when prayers are answered, I want to remove them from the box! Makes me aware of how often we are blessed with answers to our prayers. Thanks for posting.
Report Inappropriate Comment
Are you sure you would like to report this comment? It will be flagged for our moderators to take action.
Thank you for taking the time to improve the content on our site.

