Conversation Heart Felt Ring
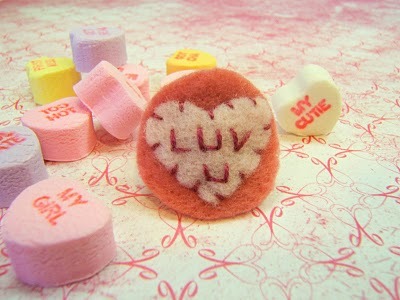
Turn a boring hair elastic into a sweet conversation heart with a bit of felt and some embroidery. Wear this felt ring in your hair on Valentine's Day, on a finger or give as a fun gift. Make bigger hearts from the felt for larger conversation messages.
Find this pattern and many more in our new eBook, 41 Valentine's Day Crafts: Valentine's Day Cards, Gifts, and More!
Materials:
- Hair elastic
- Two colors of coordinating felt, craft or wool felt
- Heart and circle templates
- Scissors
- Hand sewing needle
- Embroidery thread (approx. one 8 inch length for the entire project), divided into three groups of two strands each
- Tacky glue
- Pen
- Clothespins
Instructions:
To make my template I used a tiny cookie cutter and traced around it on the back of a cake box I dug out of my recycling bin.
When I compared the size of the heart to the size of my finger I knew it was too big so I simply used it as a guide to draw the size I needed within. The heart I used ended up being a hair shy of an inch wide and about 5/8 of an inch tall.
I have a huge bag full of felt scraps and as you can see it's not going to take much to cut out the heart.
I traced my template onto the felt using a regular ink pen but be sure to trim just inside your markings so you don't end up with this dark fuzz on your final product.
Once the heart was cut out I also cut two circles one approx. 3/4 of an inch (18mm) and one approx. 1 inch (22mm) out of my coordinating color of felt. (I used two cake decorating tips as my templates).
The hair elastic was an old one I had my bathroom drawer and was one that just didn't hold my hair back very well. I wasn't sad to put it under the knife, so to speak. :)
To make the ring, cut a section of the hair elastic just a bit smaller than the actual size of the finger (remember it is going to stretch when you put it on). Use the smallest of the two circles and tacky glue it to your cut section of hair elastic. I secured it with clothespins to hold it in place while drying.
While you're waiting you can make the "conversation" part of this project. Conversations hearts have brief and horrifically spelled messages so I chose "Luv U" for its brevity and because I knew it would be easy to stitch. :) You could probably draw on a guide for yourself but I didn't want to chance there being dark marks not hidden by the thread. Freehanding is possible (as evidenced by mine!) but make sure to start in the top center and stitch the "u" for "luv" this will assure your word is centered. Of course there's always the chance of a little crookedness (I knew you'd be too polite to bring it up yourself) but just remember that real (candy) conversation hearts aren't perfect either!
I centered my messaged heart onto the center of the large (1 inch) circle and stitched around its border.
Once the glue on the small circle and hair elastic was dry, I took a leftover scrap of embroidery thread and put a couple of stitches across the elastic. I don't know that it's necessary but it made me feel better.
Then I applied plenty of tacky glue to the top of the small circle and placed it in the center of the large circle (this should hide all of your stitches from securing the heart). I again used clothespins to secure it while drying, placing four total around the circle.
When it dries you'll have a sturdy, wearable token of affection for your Valentine made with humble scraps and throwaway items, but more importantly made with love!
Read NextValentine Chocolates
Your Recently Viewed Projects
Report Inappropriate Comment
Are you sure you would like to report this comment? It will be flagged for our moderators to take action.
Thank you for taking the time to improve the content on our site.

