Created With Love Paper Purse Card
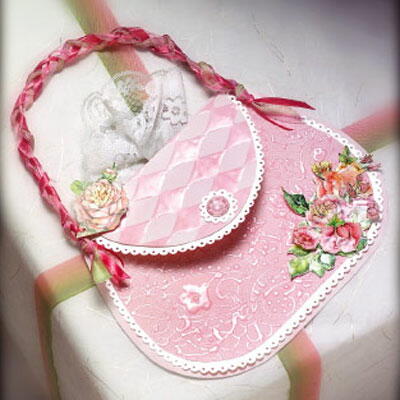
When you want the gift wrap to say as much as the gift - create this beautiful gift tag.

Materials:
- Aleene's® Memory Glue™
- Aleene's® Paper Glaze
- Aleene's® 2 in 1 Glue™
- Hand punch, 1/16”
- Clear button, ½”
- Scissors
- Ribbons, (3) coordinating colors and different widths
- Scrap of lace
- Scrapbook Papers, (3) coordinating designs- floral, stripe, and one solid
- Scallop edged scissors
- Wire cutter
Patterns:
Steps:
- Cut first purse layer, A. from one of the design papers using straight edge scissors. Fold over ½” at the straight edge at the top.
- Cut a second layer of A. slightly smaller, from the solid paper using scallop edge scissors. Punch holes in each scallop to create a lacey edge.
- Cut the third layer, slightly smaller than scalloped layer but use straight edge scissors.
- Using Memory Glue, glue together the second and third layers with the lacey edge showing. Cut off ¾” at the top.
- Cut the first layer of the flap, using scallop edge scissors and pattern B. from the solid paper. Punch holes in the scallops.
- Cut pattern C. from design paper with straight scissors and glue on top of B. with the lacey edge showing. Fold over ½”of top of C. Glue folded area to the back, at the top of the purse layers, (second and third). Now glue layers to the first purse layer, with fabric lace inserted, about ¼” down from the top. Only glue this top edge. The flap should lift up for writing sentiments.
- Apply Paper Glaze to a paper design (floral) as desired and let dry completely. Apply Paper Glaze to the top area of the purse as design permits. Note: Outline designs or enhance darker colors or create a design on top of paper design. Let dry. Cut flower or design out and layer as desired and glue to the right bottom edge of purse.
- Cut a 1” circle with the scallop scissors and punch holes. Glue to the top center of the flap. Cut the loop off the back of the button and glue to circle.
- Braid ribbons to form a handle and glue to the sides of the purse.
- A tag can be cut from one of the design papers and folded in half. Punch a hole in the corner and attach to handle with ribbon.
- A small amount of 2 in 1 Glue can be added to the flap and let dry before touching purse area. This will allow it to be opened and closed without tearing the paper.
- Add card sentiment under flap.
Read NextValentine Chocolates

