Felted Swirl Wreath
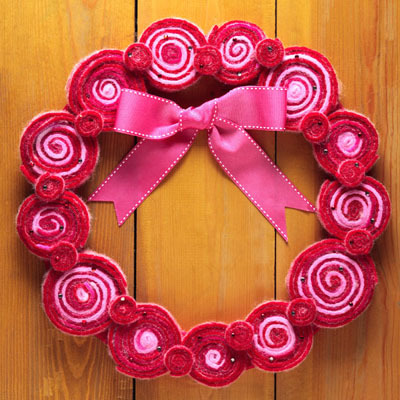
Welcome your honey home with this colorful Felted Swirl Wreath from I Love to Create. This simple Valentine's Day decor is great for hanging on your front door or above the mantel in your living room. You could even make this a Christmas wreath by using red felt instead of pink. This is a simple and fun project you can have out year round, and anyone can make it!
Find this project and many more in our free eBook, How to Make Tie Dye Shirts, Decor, and More: 18 Tie Dye Patterns!

Materials:
- Aleene's® Fabric Fusion™ Permanent Dry Cleanable Fabric Adhesive™
- Tulip® One-Step Fashion Dye™ in Fuchsia and Red
- Tulip® Cordless Heat Setting Tool™
- 1 300-pack Clear Tulip® Glam-It-Up!™ Iron-On Crystals™
- Plastic disposable tablecloth or large plastic garbage bag
- Floral and Craft Ring,12” flat compressed wood
- Cutting mat
- Ribbon, 2” wide coordinating color and ¼” wide for hanger
- Wool Felt, white ¾ yd. 18” wide
- Rotary Cutter
- Rotary Cutter Clear Ruler
- Fabric, cotton scrap of coordinating solid color
Instructions:
-
Wet the felt with water and spin on gentle in the washer to remove excess water.
-
Cover work surface with plastic.
-
Wearing rubber gloves, add water to the top of the dye bottles. Replace cap tightly. Shake until dye is dissolved.
-
Place damp felt on plastic. Squeeze the Red dye onto about half of the felt.
-
Starting on the edge of the Red and overlapping an inch or so, squeeze the Fuchsia dye onto half of the remaining area of the felt but saving about 1” of dye in the bottle. Add water to the dye in the bottle to make a light pink and squeeze onto the remaining felt. The felt should be saturated in dye. Wearing gloves, press down with fingertips to push the dye into areas that are lighter.
-
Cover felt with plastic. Let sit 4-6 hours. Wash in a large load of water with a small amount of laundry soap on a gentle cycle. Line dry.
-
Using a cutting mat and rotary cutter, cut ½” strips from every section of color. Where the dye over lapped it will be a little different color and this is desirable so cut those areas also.
-
Make a snip in the end of the cotton coordinating fabric and tear 2” strips. Glue the end of a strip to the craft ring with Fabric Fusion and start wrapping around the ring. Proceed by adding another strip, gluing as needed while wrapping to keep in place until it is completely covered.
-
Feeling through the fabric, find one of the small holes and push a pencil or sharp object through to the back. Run the small piece of ribbon through and tie in a knot to use as a hanger.
-
Starting with the lightest color of felt, add a small amount of Fabric Fusion and roll into a pinwheel continuing by adding another color with glue ending with the Red felt. Change the order of color to make all of the pinwheels unique and ranging in size from 3” to 2 ¼”. Refer to photo.
-
Arrange the pinwheels on the ring until they fit all the way around while touching each other. Squeeze out Fabric Fusion onto the ring under the area where each pinwheel will sit pressing pinwheel into the glue.
-
Cut ¼” strips of the red felt and roll into small 1” pinwheels and glue on top of each intersection where the large pinwheels meet. Glue in place and press down with fingertips. Let dry flat.
-
Attach the red and pink crystals with the heat tool. Scatter them over the large and small pinwheels. Pressure is not needed when attaching the crystals as long as the tip of the tool is touching the crystal.
- Tie the 2” ribbon into a bow and glue the backside of the loops at the top, onto the pinwheels.
Read NextValentine Chocolates
Your Recently Viewed Projects
Report Inappropriate Comment
Are you sure you would like to report this comment? It will be flagged for our moderators to take action.
Thank you for taking the time to improve the content on our site.

