Vintage Ornaments
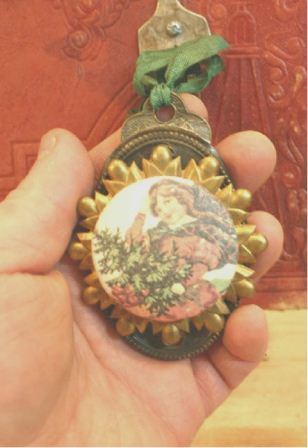
Use vintage hardware bits and vintage images to create fabric-button ornaments for decorating the home. These ornaments are great for holiday gift-giving or fun any time you want a bit of vintage charm. Follow this tutorial from Dara DiMagno.


Materials:
- Packages of Dritz Domed Cover Your Own Buttons
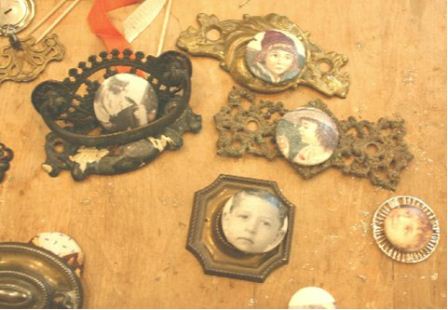
- Vintage Hardware Bits – drawer and door hardware works well
- Neat images –old photos, clipart from Dover books is awesome

- Transfer paper- I go to the local printer and use the transfer paper that goes into the color copier….you can get a kind that goes through your computer too
- tightly woven cotton fabric….I use curtain lining…you don’t need much
- an iron set on dry, cotton
- Ribbon for hanging – I like to use old seam binding
- 2-part Epoxy

- tooth picks to mix epoxy
- bit of vintage paper for the back
Instructions:
- Gather materials.
- Choose images and copy on to transfer paper.
- Cut out images and iron onto fabric.


- Carefully pull off backing paper and trim to circle size according to directions on Dritz Package Pattern.


- If you choose ( I do) use pliers to remove shank, this way your button will be flat.


- Carefully put fabric with image into teeth of button. Usually I anchor the top and bottom and then the sides. This way the image is even. Then carefully work the rest of the edges into the teeth….try to smooth out bubbles and wrinkles. You may have to practice a couple of times to get this how you want it.


- Press on back piece…you will hear it snap tight.


- Mix up a small amount of 2-part epoxy and add the “Button” to your choice of hardware bit. Let dry 5-10 minutes.

- Add a piece of old paper ( I sign mine first) to the back of the hardware.

- After allowing it to dry add ribbon or seam binding hanger.

Read NextRetro Wallpaper Window
Your Recently Viewed Projects
Report Inappropriate Comment
Are you sure you would like to report this comment? It will be flagged for our moderators to take action.
Thank you for taking the time to improve the content on our site.

