3 D Canvas with Silk Flowers
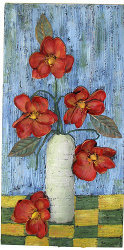
Give a floral canvas painting real dimension with stiffened silk flowers and a 3-D vase made from a plastic water bottle. This great project from Heidi Borchers of Inspired at Home is a great way to recycle a plastic water bottle instead of tossing.

Materials:
- Canvas – 12” x 24”
- Texture paste (Aleene’s True Snow works great for this) – 2 jars
- Palette knife
- Texture comb (You can buy these at home improvement stores in paint department or you can make your own from mat-type cardboard – see Heidi’s Designer tip to make your own texture tool.)
- Silk flowers and leaves (I purchased mine from a dollar store. Remove flowers from stems. Cut stems to fit into arrangement.)
- Aleene’s® Fabric Stiffener
- Brush – ½” flat
- Plastic water bottle – Cut in half for vase
- Paints: Black (paint entire dried background, flowers & plastic bottle vase)
- Background – Upper: Dark Blue (Navy), Med Blue (Denim) Lt. Blue (Sky)
- Lower: Yellow, Red, Orange and Dark Green (Pine), Lt. Green (Wedgewood)
- Flowers: Burgundy, Red, Orange, Yellow
- Leaves and stems: Dark green (Pine), Med. Green (Leaf), Brown (Chocolate)
- Vase: Beige (Butter Cream, Lt. Green (Wedgewood)
- Wax paper
- Plastic zip lock bag
Instructions:
- Using the palette knife, apply and spread an even thickness of the texture paste onto the canvas background and the sides of the canvas. To create the texture on the background, pull the texture comb through the texture paste while it is still wet. Create the texture on the bottom 5” of the canvas in a different direction. Place a small amount of texture paste onto the half of plastic water bottle. Place this into the wet prepared background of the canvas. Using photo as a placement for this process.
- Put wax paper onto your workspace. Place the silk flowers and leaves into the plastic zip lock bag. Pour some of the Fabric Stiffener into the bag over the flowers and leaves. Close the bag tightly. Work the fabric stiffener into the silk flowers. Make sure you get all the flowers covered. Carefully pull out one flower at a time, and arrange flower onto the wax paper. Arrange the petals, and the leaves, the way you want them to dry, then carefully place onto the prepared background. Repeat with all flowers and leaves. Place the stems into the background. Let Fabric Stiffener and texture paste dry completely.
- Using a brush, paint the entire prepared background, vase, flowers, and leaves with black paint. Let paint dry.
- To paint the colors onto the entire art piece, you will be layering the paint colors. Each layer of color should be almost dry before applying the next color: For the upper background, first brush on the navy blue over the upper background area. Second, brush on the medium blue paint. Then the light blue paint. The upper background also has a few brush strokes of medium green as a final touch. For the lower background/Checkerboard: Yellow area, first paint yellow, then orange, then small dry brush strokes of Red. For the Green area, first paint dark green, then light green. For the Vase: Paint the beige, then dry brush strokes of the light green. For the Flowers: Paint the burgundy first, then the red. Paint the orange at the center area of the flower and the tips of the flower. For the flower center, paint yellow, then orange. For leaves and stems, paint dark green. Dry brush with the medium green and the light green. Dry brush the edges of the leaves with the brown paint.
Heidi’s Designer Tip: To make your own texture comb, cut a piece of heavy mat board approximately 2” x 4”. Using pinking shears, cut along one edge of the 4” side. Clean the cardboard off each time you pull through the texture medium.
Have more plastic bottles you want to re-purpose? We've gathered the best 14 Easy to Make Water Bottle Crafts just for you!
Read NextWindow Frame Seashell Crafts
Your Recently Viewed Projects
Report Inappropriate Comment
Are you sure you would like to report this comment? It will be flagged for our moderators to take action.
Thank you for taking the time to improve the content on our site.

