Geisha Wall Canvas
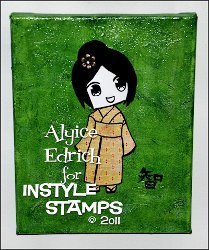
If you're looking for an easy anime project and a cute pattern to put in your little girl's bedroom, take a look at this Geisha Wall Canvas design from Alyice Edrich, a great wall art and decor idea. It's a simple project that will take any room to a whole new level!

Materials:
- 8" x 10" Canvas
- 5x7" print out (Mykai from InStyle Stamps)
- 1 stamp - Japanese writing for the word "wisdom"
- 1/2" copper flower
- 1 tiny pearl bead
- Copy Paper
- Tissue Paper - white
- 1 sheet white cardstock
- 1 sheet suede cardstock
- 1 sheet of patterned scrapbook paper (from the Curio Paper Pad line)
- Gesso - white
- Acrylic Paints: Hooker's Green, Carbon Black, and Titanium White
- Paintbrushes
- Graphite pencil
- Pen
- Mod Podge®, matte
- Micron Pen, black
- Acrylic spray sealer
- Paper towel
- Printer
- E-6000 Glue
Instructions:
- Download your purchased digital stamp from InStyle Stamps.
- Resize the image to 5" x 7" in your digital software program.
- Print to copies of the image out on regular copy paper.
- Paint a thin layer of gesso over the surface of the canvas and let dry.
- Rip tissue paper into various shapes and sizes, making sure you do not have any straight edges.
- Use Mod Podge® to adhere the tissue paper to the canvas and let dry. This will give the illusion of waves and add texture when you paint your image.
- Paint the canvas with a wash of green and let dry.

- Dry brush Titanium white over the top of the green and let dry.
- Cut out one of the Geisha girl images to create a template.

- Trace the body (outfit) onto the backside of your patterned scrapbook paper and cut it out.

- Use Mod Podge to adhere the body, right side up, onto the painted canvas and let dry.
- At this point, you can freehand the lines on top of the outfit using a Micron black pen, or you can cut the template into pieces, then trace each piece onto the outfit.
- Trace the head onto the backside of your white cardstock and cut it out.
- Use Mod Podge to adhere the head, right side up, onto the painted canvas and let dry.
- Flip the print out of the head over, and using a graphite pencil, shade in the area of the face.

- Place the graphite side down onto the top of your head and using your pen trace the eyes and mouth onto the head. (To make sure your image is transferring, lift up the corner. If it's not transferring, remove and add more shading.)
- Use a black Micron pen to go over the features of the eyes and mouth.
- Using a narrow paintbrush, go over the lines of the outfit as well as the eyes and mouth with black paint and let dry.

- Paint the eyes the non-black of the eyes white and let dry.
- Trace the hair onto the backside of your suede cardstock and cut it out.
- Use Mod Podge to adhere the hair right side up, onto the painted canvas and let dry.

- Use a thin-tipped paintbrush to dab a little E-6000® on the backside of the copper flower, then adhere it to the hair.
- Apply a little E-6000® on the backside of the pearl bead and adhere the bead to the center of the copper flower. Let dry.
- Use a thin-tipped paintbrush to spread black paint on the Japanese stamp, then place your hand under the canvas to offer support, turn the stamp right side up and press the stamp down into the canvas. Gently lift the stamp and let dry. (If some of the paint did not adhere to the canvas, simply use a thin-tipped paintbrush to fill in the missing area.)

- Seal the canvas with acrylic spray sealer, and let dry over night.
- Turn the canvas over and sign.
FTC Disclaimer: Mykai anime was provided, free of charge, by Instyle Stamps. This post was written while I participated on the InStyle Stamps design team as a Chickie. www.InStyleStamps.com and www.InStyleStampsBlog.blogspot.com

