Geometric Fabric Wall Art
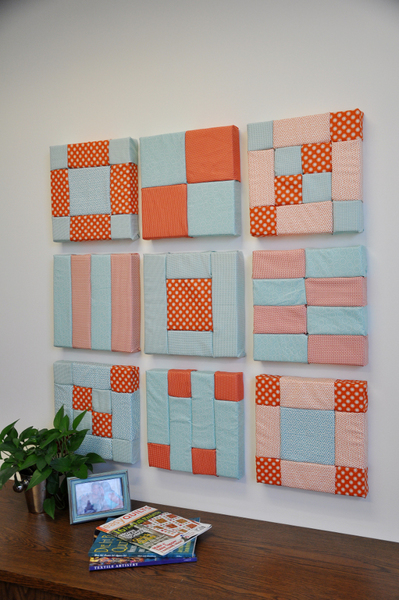
Add color and style to any room in your home with this Geometric Fabric Wall Art. Made using On-the-Grid tiles and a variety of fabric pieces, this is a fun and decorative way to show off your fabric scraps! You can plan out this project ahead of time, or just make it up as you go along! Great for creative minds and those looking for unique decoration ideas, these Geometric Fabric Wall tiles are a fabulous way to experiment with colors, shapes, and patterns.

Materials:
- 12” Foamology On-the-Grid tiles (we used 9)
- Printed cotton fabrics in assorted sizes. (we used approximately 1yd each of seven coordinating fabrics)
- Cutting tool – you can use Scissors, Pinking Shears or a Rotary cutter and mat.
- Quilting ruler
- Glue Gun
- Tacky Glue or Fabric Glue (optional)
- Butter knife
Planning Your Project:
- You can design your pattern on grid paper or just let your creative juices flow and make it up as you go along.
- To determine the size of fabric to cut:
- Allow one inch of fabric to tuck into the inner grooves.
- Allow three inches of fabric to wrap around and adhere to the back.
- For corners, make sure you have three inches on the top or bottom and side to wrap around and adhere to the back.
- Use pinking shears to cut the fabric with clean, fray free edges.
Instructions:
- Always work from center to the side edges.
- Position fabric piece on soft foam and tuck into grooves with a butter knife. Secure with a line of glue to make it permanent.
- When wrapping fabric around the foam to the back, fold the fabric as you like around the side, then secure on the stickybase™.
- It’s best to peel back stickybase liner from edges as you work – DO NOT remove entirely until you are ready to mount to the wall.
- Use a glue gun on the back corners to secure fabric in place.
Read NextWindow Frame Seashell Crafts

