Grateful Heart Canvas
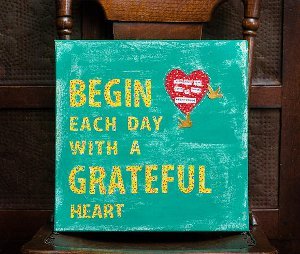
Create your own beautiful canvas artwork with this stunningly simple Grateful Heart Canvas. Great for adding color and style to your living room, bedroom, or kids room, this painted canvas can be made in a few simple steps. You could also use this simple canvas painting technique to create your own saying. This is a fun and easy project that crafters of all ages are sure to love.

Materials:
- Canvas
- Paint
- White Gesso
- Fabric
- Vinyl letter stickers
- Cutting Mat (12" x 18")
- Titanium Softgrip® Comfort Loop Rotary Cutter (45 mm)
- Jenni Bowlin Flight Squeeze Punch (Large)
- Ultra ShapeXpress™ Starter Set
- 3" x 18" Acrylic Ruler
Instructions:
-
I began this project with a 14 x 14 inch stretched canvas and a piece of 17 x 17 inch fabric that I cut using a Fiskars acrylic ruler, rotary cutter, and cutting mat.

-
Next I pulled the fabric taut across the front of the canvas, using a staple gun to staple it to the wood frame on the back.

-
When I was finished, I checked to make sure the fabric wasn't loose or severely wrinkled.
-
Getting perfectly hand-cut fabric letters can involve a lot of time and patience. If you're short on both time and patience, you can achieve the same look quickly and easily with some paint and some vinyl letter stickers.
-
Using the 3.5 x 18.5 acrylic ruler to give me even placement, I applied the vinyl stickers to the fabric. My quote required 2 packages of letters. One nice thing about vinyl letters is they are reusable.

-
After applying the stickers, I painted on a coat of Gesso. I didn't paint directly onto the fabric for 2 reasons. First, my pattern was very bright and bold and it would have required several coats of paint to cover it. I was looking for a distressed paint surface and had I used several coats, I would have had an opaque surface instead. The gesso showing through gives some dimension to my painted surface that would have been missing with a solidly painted surface.

-
Second, since I was using inexpensive bottled liquid acrylic paints, they would have soaked into the fibers of the fabric and likely would have bled around the edges of the letters. The calcium carbonate in gesso seals the fabric by creating a new surface on top of it. So now my paint soaks into the gesso surface instead of my fabric. I pounced my gessoed brush up and down around the letter stickers so I wasn't pushing it under any edges that might not have been tightly adhered.
-
When the gesso was dry, I painted over it with acrylic paint, again being careful around the letter stickers and pouncing more than brushing.

-
After the paint dried, I peeled away the letter stickers and this is what I was left with. Perfect letters!

-
I finished the canvas by adding a fabric heart using a Fiskars Shape Cutting Template to trace the shape onto my fabric. I added some hand stitching and a couple of birds punched with the Jenni Bowlin Flight Squeeze punch that I coated with Tim Holtz Distress paint in Tarnished Brass. I printed another quote out on regular printer paper and thought it looked a little unfinished after I adhered it to the heart. I'm one who at the end of a project, rather than spend a lot of time searching through my supplies, always begins looking around at my surroundings to find some extra little thing to help me finish. This time I grabbed a plastic shopping bag from my trip to the store earlier in the day and added some small pieces to the pieces of paper.

- This is a project that is very satisfying when you're finished because it is fast and easy, but the texture and character of the painting technique gives impressive results!
Read NextDip Dyed Macrame Wall Hanging

