Simple Button Tree Art
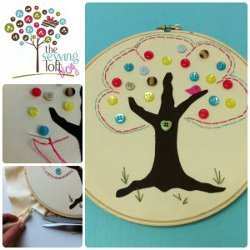
Grab some colorful buttons and create your own Simple Button Tree Art from Heather Valentine. This project shows that button craft ideas don't have to be complicated. Instead, use to adhere each of the buttons to the canvas. Be sure to display your artwork with pride!

Materials:
- Buttons
- Embroidery thread
- Embroidery hoop
- Fabric scraps
- Glue dots
- Tacky double-stick sheets
Instructions:
-
Starting with pressed fabrics, peel the backer off the double stick sheets and apply to your brown fabric. *Note: Take your time, this is super sticky.
-
Then free hand a tree base shape or use the tree hugger applique design. Trace and cut your shape. *Remember cutting counts here!
- Determine where you would like your tree base to live on your artwork, peel other side of sticky tape and position in place. Be sure to firmly press any bubbles or wrinkles out.
-
Grab your buttons, glue dots and start placing your leaves…oops, I mean buttons in place. I even added a small birdie for fun.
-
Position your artwork in hoop. Cut excess fabric away leaving 1/2″ allowance for folding under and gluing in place.
-
As a final detail, I used embroidery thread and a simple running stitch in two colors and added some grass.

For a comprehensive video tutorial of this project, check out How to Make a Button Tree in Embroidery Hoop.
Read NextRecycled Books Coloring Wall Art

