Best Beaded Headband
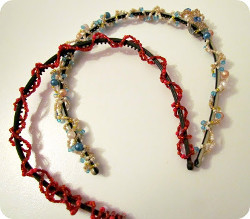
If you're looking for an easy wire jewelry tutorial, this is your best bet. This Best Beaded Headband is a great way to accessorize and experiment with jewelry designs. Through these craft instructions you'll learn how to take wire, beads and a plain headband and transform them into something chic and stylish. It's simple and looks adorable. You won't believe how cute you can look without breaking your wallet. Be bold by adding a little bling to your accessories.

Materials:
- Headband
- Small gauge wire (make sure your beads will fit onto it)
- Beads
- Optional: Round nose pliers
Instructions:
-
Cut a piece of wire at least 1 metre (39") long.

-
Using your pliers wrap one end of the wire to make a small ball. If your wire is soft enough you can probably just bend it with your fingers. There is no technique to this, you just want something that will stop the beads from sliding right off the end.

-
Start loading up your wire with various beads. Use different sizes, some matte some sparkly, etc. This will give it more variation and create more interest.

-
Once you've filled up your entire metre of wire with beads create another 'knot' at the end, again this is just so that the beads won't fall off.

-
Wrap your beaded wire around your headband.

-
You should have enough wire to circle back to create a criss-cross pattern.

-
Tuck the end in and bend it so that it's secure and that's it! You're ready for the party!

Read NextDeadly Horned Pauldrons

