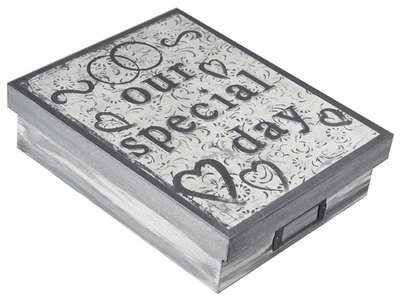
Wedding Memories Storage Box
Preserve precious wedding memories in this wooden storage box decorated with scrapbook paper and painted with silver paint.

Materials:
DecoArt Products Required
Americana Acrylics
- DAO1 - Snow (Titanium) White
Dazzling Metallics
- DAO70 - Shimmering Silver
Americana Brushes
- DBR2004-B - Round 4
Multi-Purpose Sealer
- DS17 - Multi-Purpose Sealer
Supplies
- Wedding-themed scrapbook paper (We used Sandy Lion/Abby Simons Design, RMSC13317 Silver Splash.)
- Aleene's Quick-Dry Tacky Glue
- Scissors
- Ruler
- 1" wide flat brush
- 1" wide foam brush
- 2" wide plastic bathroom cup or small round plastic container
- Paper towels
- Foam plate
- Hair dryer
- 2" chipboard letters
- Unfinished wood storage box, Don Mechanic, Ent., "Finish-It" box, 399984
Instructions:
1. Basecoat box Snow White; let dry.
2. Use Shimmering Silver and foam brush to dry brush horizontally around box sides and bottom.
Let dry.
3. Paint Shimmering Silver on box sides and 1/2" around top edges of lid as well as on chipboard letters to spell "our special day". Let all dry.
4. Apply coat of Multi-Purpose Sealer to box and lid sides and let dry.
5. Cut 9 1/4" x 11 3/4" piece scrapbook paper. Apply thin, even coat of tacky glue to top of lid 1/2" from edge. Place paper at center of box lid and smooth flat; brush glue under edges of paper to secure well. (A paper towel can be used to wipe away excess glue outside edges of paper.) Let dry.
6. Referring to photo for placement, use tacky glue to glue letters to top of box lid (or remove adhesive backing from letters if self-adhesive).
7. Use rim of bathroom cup dipped into Shimmering Silver to paint two overlapping rings on lid; let dry.
8. Use round brush and Shimmering Silver to paint swirls by rings and hearts to fill in open spaces on lid; let dry.
Helpful Hints
1. We used natural finish chipboard letters, but you can paint over colored letters as well.
2. A hair dryer on low heat setting can be used to speed drying of paint and to speed drying of glue to avoid wrinkles in paper.
Read NextDIY Burlap Aisle Runner